
- Why you should be using Packer
- Getting Started with Packer
-
Best Practices
- Step by Step
- Generic Templates
- Use guest additions mode of attach
- Use environment variables to change the action of a provisioning script
- Keep the OS information in your build script
- Disable WinRM on build completion and only enable it on first boot
- Use headless mode
- Set a high shutdown and WinRM timeouts
- Conclusion
Why you should be using Packer
Already know why Packer is useful? Jump directly to the best practices.
When you develop automation, for example, PowerShell Desired State configuration resources, where do you test them?
If the answer is locally on your machine or a remote Virtual Machine platform, you are missing out on some opportunities of speed and reduction in your development and test cycle time.
Have a look at Gael Colas’s awesome introduction to Test-Kitchen and Kitchen-DSC, which will show you how to develop and test your DSC resources easily on your local machine inside Virtual Machines.
As part of this workflow, you will need to use a base virtual machine where you apply your DSC configurations too. Depending on your environment, you may need to apply the same DSC resource to multiple machine configurations, for example:
- Windows 2012 R2 WMF 4.0 with GUI
- Windows 2012 R2 WMF 4.0 Core
- Windows 2012 R2 WMF 5.0 with GUI
- Windows 2012 R2 WMF 5.0 Core
- Windows 2008 R2 WMF 4.0 with GUI
- Windows 2008 R2 WMF 4.0 Core
- Windows 2008 R2 WMF 5.0 with GUI
- Windows 2008 R2 WMF 5.0 Core
- Windows 2016 WMF 5.0 with GUI
- Windows 2016 WMF 5.0 Core
That is 10 different variations of Windows you need to maintain templates for! Do you manually go through each of them every month to apply their Windows updates too? What about if you need to share these base images with colleges? Do you copy 50GB of images over the internet or make your colleges build their own images? What if one of your colleges uses a Mac and has to use VirtualBox images instead of Hyper-V?
You started using Test-Kitchen because it was meant to simplify your workflow and now you have an image management problem!
![]()
This is where Packer by HashiCorp can help. Packer is a tool for creating machine images from a single configuration source. You store the entire image creation process as code, so images are always built the same way, this way, instead of having to ship entire VM templates over the internet, you can just keep your Packer configuration in source control and anyone in your team can build their own templates.
Getting Started with Packer
I will assume some base knowledge of Packer for this guide. If you are just getting started with it, I recommend Matt Wrock’s blog post titled Creating windows base images using Packer and Boxstarter.
Best Practices
Step by Step
![]() When creating Packer templates, create builds in a step by step process. Do not try and do everything in a single Packer build.
When creating Packer templates, create builds in a step by step process. Do not try and do everything in a single Packer build.
When I first started creating my Packer templates for Windows, I would include everything in a single .json file:
- Build the Windows box from a
.iso - Apply Windows Updates
- Install Windows Management Framework 5.0
- Convert to a Vagrant Box
- Upload to Atlas
The problem with this is if at any point there is a failure, you need to start the whole build process again, as Packer will automatically stop and delete a Virtual Machine on failure.
This is particularly annoying when you have just waited 4+ hours for Windows Updates to occur. There were more than a few times I felt like this having things fail after Windows updates completed:

Instead, create several Packer build .json files and “chain” them together:
- From Windows
.isoto a working machine using anAutounattand.xmlanswer file - From base image to Windows Updates and WMF 5.0
- From updated image to cleaned image (Defrag, Remove temp files etc.)
Doing this gives you several benefits:
- If a step fails, you can resume from a previous step, not start the entire process again which will save you lots of time
- It allows you to create some branching logic from your builds, for example:
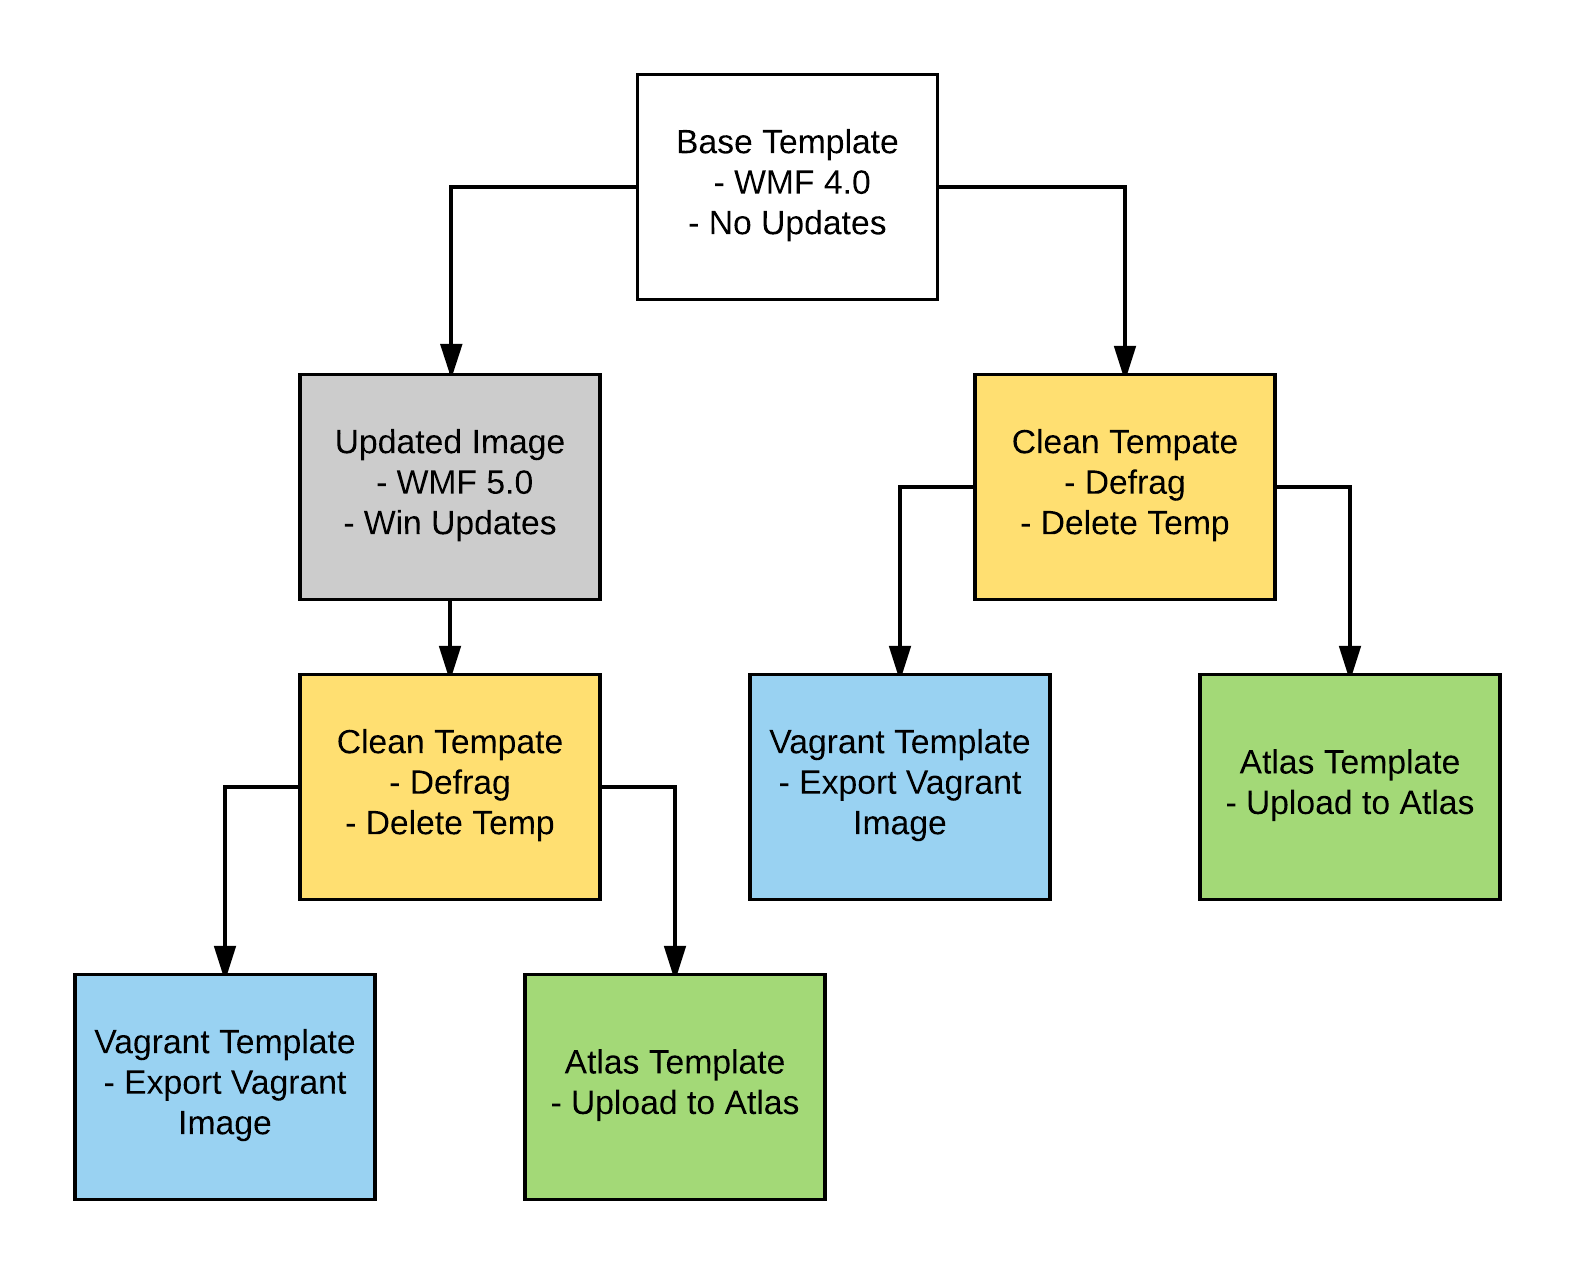
In this branching example, the matching colors mean that the same template is used. This would mean you could end up with 2 base images, one with no updates, and one with updates and WMF 5.0 installed.
The way this works is to have the Packer builder output an image with a specified name to a specified directory.
Here is an example using the virtualbox-iso and virtualbox-ovf builders. The first build in the chain coming from an .iso file:
{
  "builders": [
    {
      "type": "virtualbox-iso",
      "output_directory": "./output-window2012r2-base/",
      "vm_name": "win2012r2-base"
    }
  ]
}
The next build in the chain coming from the previous build’s VirtualBox .ovf file.
{
  "builders": [
    {
      "type": "virtualbox-ovf",
      "source_path": "./output-window2012r2-base/win2012r2-base.ovf",
      "output_directory": "./output-window2012r2-with-updates/",
      "vm_name": "win2012r2-with-updates"
    }
  ],
  "provisioners": [
    {
      "type": "powershell",
      "inline": [
        "Do windows updates here"
      ]
    }
  ]
}
You can read in detail about User Variables in the Packer Docs.
Generic Templates
Once you start making a few Packer .json template files for different Windows versions, you will notice they start to become very similar, and you will find you are repeating a lot of your code.
![]() Keep templates as generic as possible, and use User Variables.
Keep templates as generic as possible, and use User Variables.
When your templates are generic and accept user variables, you can pass variables to the Packer template via the command line. In the below example, I am passing the source path for the base image (C:\packer\output-window2012r2-basewin2012r2-base.ovf) into the build.
Here is a snippet of 02-win_updates-wmf5.json:
{
  "builders": [
    {
      "type": "virtualbox-ovf",
      "source_path": "{{user `source_path`}}"
      }
  ],
  "variables": {
    "source_path": ""
  }
}
Doing this also makes it possible to reuse the same Packer build template at any part of your build branch (see above).
Use guest additions mode of attach
![]() When installing guest additions, use attach mode.
When installing guest additions, use attach mode.
Using the attach method for the guest additions is much faster and more reliable than using upload, especially over WinRM.
You will also need to un-mount the attached ISO after the build completes using vboxmanage_post because the ISO will not detach itself. This issue is being tracked on GitHub in issue #3121.
{
  "builders": [
    {
      "guest_additions_mode": "attach",
      "vboxmanage_post": [
        [
          "storageattach",
          "{{.Name}} }}",
          "--storagectl",
          "IDE Controller",
          "--port",
          "1",
          "--device",
          "0",
          "--medium",
          "none"
        ]
      ]
    }
  ],
  "provisioners": [
    {
      "type": "powershell",
      "script": "scripts/install_oracle_guest_additions.ps1",
      "elevated_user": "vagrant",
      "elevated_password": "vagrant"
    }
  ]
}
Then you can use the PowerShell script install_oracle_guest_additions.ps1 to install the tools:
Use environment variables to change the action of a provisioning script
This one helps you to keep your templates very generic. Say for example I wanted to have the option to install VirtualBox tools or not for a build, without having separate templates, I could do the following:
- Create a user variable called
install_vbox_toolswhich accepts either true or false - Pass the user variable to the provisioning script where I am running
install_oracle_guest_additions.ps1as an environment variable calledinstall_vbox_tools - Inside the
install_oracle_guest_additions.ps1, read theinstall_vbox_toolsenvironment variable and take either install them or not depending on if the variable is true or false
Here is an example Packer template:
This is an example of the install_oracle_guest_additions.ps1 PowerShell script:
When you run the Packer build, you can pass -var "install_vbox_tools=true" or -var "install_vbox_tools=false" and the PowerShell script provisioner will take the appropriate action.
Keep the OS information in your build script
![]() Keep your operating system related information inside your build scripts instead of inside the Packer templates.
Keep your operating system related information inside your build scripts instead of inside the Packer templates.
Now you have made your Packer build .json files very generic, you can move the OS related information into a build a script, and pass them as user variables.
Here is an example PowerShell build script, where the Windows 2012 R2 or Windows 2016 Core could be installed using the same Packer templates.
Disable WinRM on build completion and only enable it on first boot
If you are running sysprep on your Windows images, when they first boot they will need to restart themselves. This fine in normal circumstances, but when using the images in Vagrant for example, on the first boot, Vagrant will detect that WinRM is up and start connecting, and then the machine will restart. This will make Vagrant think the machine has failed or isn’t in the correct state.
The trick to this is having WinRM disabled until the very last moment, after the initial sysprep reboot.
![]() Keep WinRM disabled or blocked by the firewall until the system has had its final boot after sysprep.
Keep WinRM disabled or blocked by the firewall until the system has had its final boot after sysprep.
To do this as part of your Packer build:
- Use a PowerShell script provisioner to drop a
PackerShutdown.batfile on the system. This shutdown command will block WinRM in the firewall and then sysprep the machine. We will use this as the Packer shutdown command from inside our build.
- Use a PowerShell script provisioner to create a batch file at
C:\Windows\Setup\Scripts\SetupComplete.cmdcontaining the following:
This script will be run automatically by Windows after the machine reboots from the sysprep. It will unblock WinRM in the firewall at the right time for us.
- Use the
PackerShutdown.batfile we created as theshutdown_commandin your builder:
{
  "builders": [
    {
      "shutdown_command": "C:/Windows/packer/PackerShutdown.bat",
      "shutdown_timeout": "1h"
    }
  ],
  "provisioners": [
    {
      "type": "powershell",
      "script": "scripts/save_shutdown_command.ps1"
    }
  ]
}
You can find a full example of the save_shutdown_command.ps1 script in my Packer repo.
Use headless mode
![]() Use headless mode when building images.
Use headless mode when building images.
When using the VirtualBox builder, using headless mode errors a lot less. You can still access the GUI for the virtual machine by manually loading the VirtualBox and double clicking on it.
{
  "builders": [
    {
      "type": "virtualbox-iso",
      "headless": "true"
    }
  ]
}
Set a high shutdown and WinRM timeouts
As you have probably noticed when you install a ton of Windows updates on a machine, it can take a long time to reboot.
To prevent this sort of thing from causing the Packer build to fail, make sure you set a high winrm_timeout and shutdown_timeout.
{
  "builders": [
    {
      "winrm_timeout": "12h",
      "shutdown_timeout": "1h"
    }
  ]
}
Conclusion
Using these practices will help you on your way to creating some awesome Windows based Packer images.
All the code mentioned in this post is available at https://github.com/MattHodge/PackerTemplates/.
Thanks to @mwrockx for his work getting me started on Packer templates and @kikitux for his advice on Packer.