
I have recently been writing some class based DSC resources and have been enjoying the experience much more than (trying to) write DSC resources in PowerShell v4. Using classes really simplifies the development process of the DSC resources, and I believe class based resources will be the norm going forward.
As PowerShell v5 RTM has only been recently released back in February 2016, the large majority of DSC resources available on GitHub still use the Get-TargetResource, Test-TargetResource and Set-TargetResource functions, so I found it a little hard to get started as there was a lack of examples.
Hopefully the following 5 tips will save you some time and pain when going down the path of writing your own class based resources!
- Tip 1 - Structure your DSC Resource in a standard manner
- Tip 2 - Create a symbolic link between the DSC resource in your local repo and your PowerShell module path
- Tip 3 - Press Control + Space For IntelliSense on the DSC Resource in the PS ISE
- Tip 4 - Verifying the resources your DSC module is exposing
- Tip 5 - Testing Class Based Resources with Pester
- Wrapping up and further reading
Tip 1 - Structure your DSC Resource in a standard manner
When working on anything PowerShell related, you should be using source control. If you aren’t, you had better take a crash course in version control with Warren Frame (@pscookiemonster).
I personally have a C:\ProjectsGit directory that I create all my repos inside.
This is how I structure my DSC resources, for example, a resource called MyDSCResource would be structured like this:
C:\ProjectsGit
└── MyDSCResource\                              # Repo Directory
    ├── MyDSCResource.psd1                      # Manifest File
    ├── MyDSCResource.psm1                      # Class Based Resource
    ├── Examples\                               # Resource usage examples
    |   └── Example1.ps1
    ├── Tests\                                  # Pester Tests
    |   ├── Integration\
    |   |   └── default\
    |   |       └── pester\
    |   |           └── default.tests.ps1       # Integration tests for Test-Kitchen
    |   └── Unit\
    |       ├── MyDSCResource.ClassA.tests.ps1  # Pester unit tests, one for each class inside your resource
    |       └── MyDSCResource.ClassB.tests.ps1
    ├── appveyor.yml                            # If using appveyor
    ├── build.ps1                               # Build file
    └── readme.md
I am splitting my tests up into 2 folders:
-
Integration Tests- these are run using Test-Kitchen to validate that the DSC resources did on the machine what they were meant to do -
Unit Tests- these are run as part of the build process to validate logic in the resources. Each class should have its own unit test
If you need a composite resource to go with your DSC Resource, the structure would be as follows:
C:\ProjectsGit
└── MyDSCResource\                              # Repo Directory
    ├── DSCResources\                           # Mandatory folder name for composite resources
    |   └── CompResourceName\                   # Name of composite resource
    |       ├── CompResourceName.psd1           # Manifest File for composite resource
    |       └── CompResourceName.psm1           # Composite Resource
    ├── MyDSCResource.psd1                      # Manifest File
    ├── MyDSCResource.psm1                      # Class Based Resource
    ├── Examples\                               # Resource usage examples
    |   └── Example1.ps1
    ├── Tests\                                  # Pester Tests
    |   ├── Integration\
    |   |   └── default\
    |   |       └── pester\
    |   |           └── default.tests.ps1       # Integration tests for Test-Kitchen
    |   └── Unit\
    |       ├── CompResourceName.tests.ps1      # Pester unit tests for composite if required
    |       ├── MyDSCResource.ClassA.tests.ps1
    |       └── MyDSCResource.ClassB.tests.ps1
    ├── appveyor.yml                            # If using appveyor
    ├── build.ps1                               # Build file
    └── readme.md
Thanks to Steven Murawski for his advice on how to structure DSC repos!
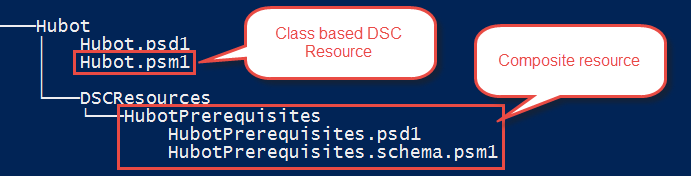
![]() Mini Tip: You cannot write composite resources as a class-based resource, but you can include composite resources WITH class based resources. Take this example:
Mini Tip: You cannot write composite resources as a class-based resource, but you can include composite resources WITH class based resources. Take this example:
Tip 2 - Create a symbolic link between the DSC resource in your local repo and your PowerShell module path
When writing DSC configurations against your custom resources in the PowerShell IDE, it makes it much easier to have IntelliSense working on your resources. The way this is usually achieved is by copying your custom resource into one of the $env:PSModulePath folder; for example the C:\Program Files\WindowsPowerShell\Modules folder.
If you don’t have your custom resource in your module folder, you get this:
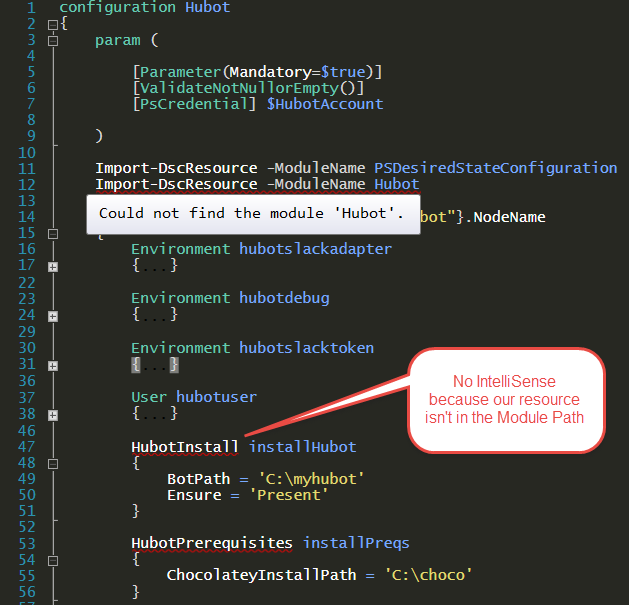
Since we want to have our resource in source control at all times, it can become painful to remember to copy your resource into the modules path every time every time you make a change.
A simple solution to this is to make a symbolic link between your resource repository and the desired path in the Modules folder:
# originalPath is the one containing the .psm1 and .psd1
$originalPath = 'C:\ProjectsGit\MyDSCResource1\MyDSCResource1\'

# pathInModuleDir is the path where the symbolic link will be created which points to your repo
$pathInModuleDir = 'C:\Program Files\WindowsPowerShell\Modules\MyDSCResource1'

New-Item -ItemType SymbolicLink -Path $pathInModuleDir -Target $originalPath![]() Mini Tip: The ISE will sometimes not automatically realize your resource has appeared in the modules directory. To fix this, just delete and replace the
Mini Tip: The ISE will sometimes not automatically realize your resource has appeared in the modules directory. To fix this, just delete and replace the Import-DSCResource -ModuleName MyDSCResource1 line in the ISE and it will discover your module correctly and give you IntelliSense.
To get a list of the symbolic links you are using in the PowerShell Modules folder:
$env:PSModulePath -Split ";" | Get-ChildItem | Where { $_.Attributes -match "ReparsePoint"} | Select-Object Target, FullName
If you want to remove your symbolic link, you can do the following:
# The recurse might make this seem scary but this just removes the symlink and not your module!
Remove-Item -Path 'C:\Program Files\WindowsPowerShell\Modules\MyDSCResource1' -Force -Recurse
Tip 3 - Press Control + Space For IntelliSense on the DSC Resource in the PS ISE
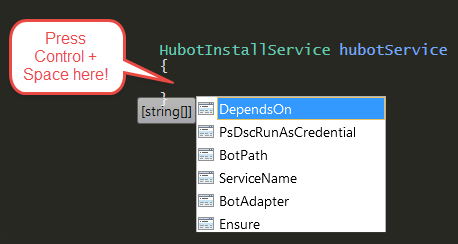
When writing DSC configurations in the PowerShell ISE, you can use IntelliSense against DSC resource’s (including your custom ones) by pressing Control + Space inside the DSC configuration block for the resource.
Tip 4 - Verifying the resources your DSC module is exposing
An easy way to verify the DSC resources your custom DSC module is exposing is to use the Get-DSCResource CmdLet:
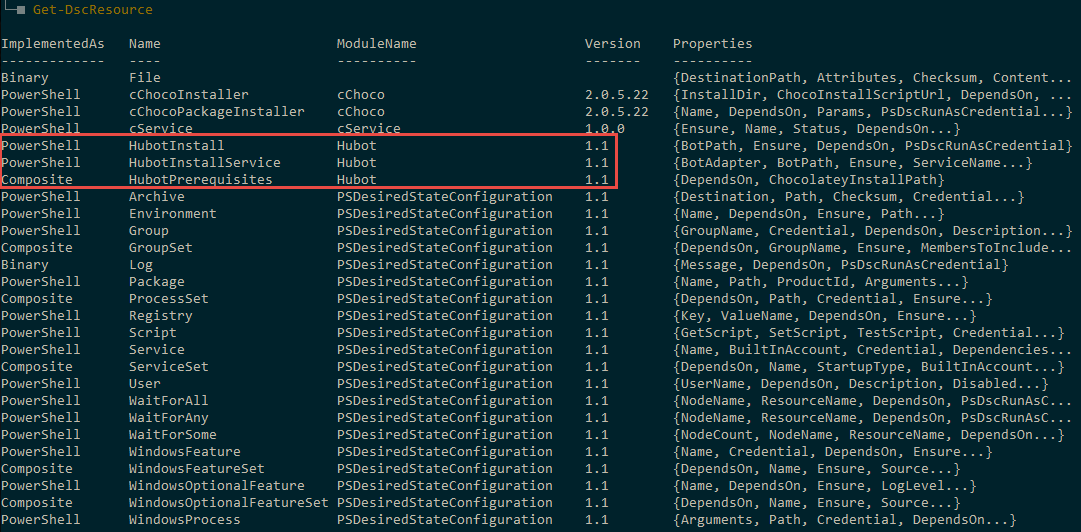
This allows you to confirm that your resource is working correctly.
If for some reason your resource is not being exposed, verify if you added it to the DscResourcesToExport array inside the DSC module manifest file (.psd1):
DscResourcesToExport = @('HubotInstall','HubotInstallService')When creating a composite resource, part of the process is to create a module manifest file for the composite. If for some reason your composite resource is not appearing in the list when you perform a Get-DSCResource, try manually loading the manifest for the composite resource.
As an example, say I have my DSC Resource and composite structured like this:
C:\ProjectsGit
└── Hubot-DSC-Resource\
    ├── Hubot\
    |   ├── DSCResources\
    |   |   └── HubotPrerequisites\
    |   |       ├── HubotPrerequisites.psd1
    |   |       └── HubotPrerequisites.psm1
    |   ├── Hubot.psd1
    |   └── Hubot.psm1
    └── readme.md
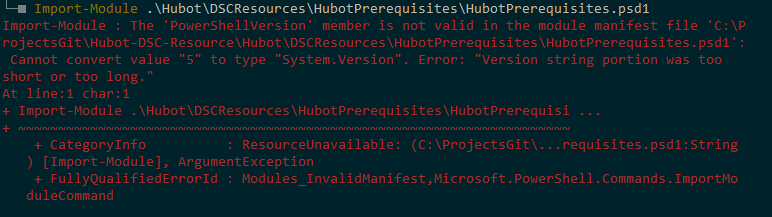
I would use Import-Module to try and import the composite resource HubotPrerequisites.psd1:
Import-Module C:\ProjectsGit\Hubot\Hubot\DSCResources\HubotPrerequisites\HubotPrerequisites.psd1This will allow me to confirm if the module is loading correctly, or give a reason why it cannot be loaded. Getting an import error means your module won’t expose the composite resource:
Tip 5 - Testing Class Based Resources with Pester
You are able to test your class based resources by putting the following in your Pester tests:
# 'using module' on the class based DSC resource .psm1
using module ..\Hubot\Hubot.psm1
Putting the using module is the secret sauce to allow you to access your classes and the properties and methods inside them.
Here is an example of how to access the test block of my custom [HubotInstall] resource:
# using on your DSC Resource .psm1
using module ..\Hubot\Hubot.psm1

# load a class in my DSC Resource
$x = [HubotInstall]::new()

# set the parameters required by the class to do a set/test/get
$x.BotPath = 'C:\mybot'
$x.Ensure = 'Present'

# Execute the test method of the [HubotInstall] class
$x.Test()
Take a look at Chris Hunt’s blog post Testing PowerShell Classes for more details on using module.
Unfortunately, with the current version of PowerShell, when you load a class with the using module method, it is cached into the PowerShell session. Even if you make changes to your class and re-run using module, the old class will be used. Take a look at this example:

To get around this, we can use a function to make Pester invoke the tests inside its own run space, meaning that the class is loaded fresh each time. (Thanks to Dave Wyatt for this tip.)
Running your tests using Invoke-PesterJob provides a workaround for the caching issue.
Additionally, if you want to bring the Pester test results into your current session, you can use Steven Murawski’s ConvertFrom-PesterOutputObject function.
For example:
Invoke-PesterJob -PassThru | ConvertFrom-PesterOutputObjectIt is a good idea to put these functions into your $PSPROFILE, or just use mine.
Wrapping up and further reading
Remember the 5 tips above when on your DSC resource writing journey, they could save you some time and pain when troubleshooting!
If you want to dive deeper into writing classed based resources, or learn about how to debug DSC Resources at run time in PowerShell v5, I recommend you check out What’s New in PowerShell v5 on Microsoft Virtual Academy.