Datadog is an awesome SaaS monitoring platform. We have 100+ developers leveraging the platform to collect their metrics, create dashboards and send alerts.

As with anything, if you don’t maintain and clean your tools, after a while things can become a little messy. Dashboards start to get named wildly different things with no standards. Alerts aren’t deleted for decommissioned services. Team names change and alerts are suddenly pointing to a the wrong Slack channel.
Something has to be done to improve the situation. Setting up some standards or rules around Datadog usage can help, but this is a fine line you need to walk between freedom and standardization. Be too strict or harsh on people and they no longer find the tool nice to use, instead thinking of it as pain in the ass.
Take too much freedom away, and you get “shadow IT” situations with people using their own tools or going their own way.
With this in mind, I decided on a few goals:
- Datadog monitors to be created from code
- Make it easy for an application to be changed to another team
- Make it easy for a team name or alert destination to be changed
- Allow all the monitors for one application to be copied and used for another application (many applications have similar metrics that need the same monitors)
Deciding on Terraform#
There were a few options around for managing Datadog from code:
- DogPush - Manage Datadog monitors in YAML
- Barkdog - Manage Datadog monitors using Ruby DSL, and updates monitors according to DSL
- Interferon - A Ruby gem enabling you to store your alerts configuration in code
- DogWatch - Ruby gem designed to provide a simple method for creating Datadog monitors in Ruby
- Ansible Datadog Montior Module - Manages monitors within Datadog via Ansible
- Terraform Datadog Provider - Supports creating monitors, users, timeboards and downtimes
I ended up deciding to go with Terraform mainly due to these two reasons:
- Being able to create timeboards using the same Terraform DSL / process.
- Terraform is also far more widely supported so from a “googling of problems” perspective (Ansible too)
Terraform with Datadog Basics#
The Datadog Blog recently published a post called Managing Datadog with Terraform.
This will cover the basics to give you an introduction to Terraform. Once you have a read, head back over to this post for some more in-depth usage.
Repository Structure & Separation of Concerns#
With the workflow in mind, I setup the following repository structure:
├── mssql # directory for the application│ ├── main.tf # contains the Datadog monitors for the application│ ├── terraform.tfvars # variables to pass into the configuration (these are passed to the inputs)│ └── vars.tf # inputs for the terraform configuration└── teamcity│ ├── main.tf│ ├── terraform.tfvarsœ│ └── vars.tfWith this structure, you would run the terraform commands from inside the applications directory:
cd mssqlterraform getterraform planterraform applyThe terraform.tfstate file will get stored in the applications directory - which means each application will have its own state file.
The reason for this is “separation of concerns” or reducing your “blast radius”. If you have 100 apps and someone makes a mistake, you don’t want Terraform to nuke the rest of the 100 apps and screw up their configuration or state.
Defining Applications and Teams#
Now we have our repository structure, let’s zoom into a specific application, for example mssql
terraform.tfvars#
The terraform.tfvars is the standard file name for Terraform variables. We will want to use these variables all over the rest of our configuration
application_name = "Microsoft SQL Server" # The application nameapplication_owner = "Database Administrators" # Team that owns the applicationnotify = ["@pagerduty-mssql"] # Array of destinations for alerts go tovars.tf#
The vars.tf is the standard file name for Terraform input variable deceleration. This is where we define what variables are allowed to be passed into our main.tf, creating the resources.
variable application_name {}variable application_owner {}variable datadog_api_key {}variable datadog_app_key {}
variable notify {  type = "list"}
When you run Terraform, it will automatically find the terraform.tfvars file and use all the variables it knows about.
Terraform will then prompt you to input variables that it isn’t aware of. You can also set Terraform variables using environment variables or pass them in at the command line. More details on variables in Terraform can be found here.
main.tf#
The main.tf is where the actual Terraform resources go.
This file will contain:
- The
providerfor Datadog, we need to passapi_keyandapp_key - The
datadog_monitorresource which will create our actual monitors
You can find the Datadog Terraform Provider documentation here.
Here is the full file:
###################    PROVIDER    ###################
provider "datadog" {  api_key = "${var.datadog_api_key}"  app_key = "${var.datadog_app_key}"}
################### DATADOG CHECKS ###################
resource "datadog_monitor" "common_free_disk" {  name    = "${var.application_owner} - ${var.application_name} - Common Disk Usage"  type    = "metric alert"  message = "${var.application_name} disk usage on {{device.name}} ({{host.name}}) is high. Notify: ${join(" ", var.notify)}"
  query = "avg(last_1h):system.disk.in_use{role:mssql-common} by {device,host} > 0.75"
  include_tags   = true}
resource "datadog_monitor" "datawarehouse_free_disk" {  name    = "${var.application_owner} - ${var.application_name} - Data Warehouse Disk Usage"  type    = "metric alert"  message = "${var.application_name} disk usage on {{device.name}} ({{host.name}}) is high. Notify: ${join(" ", var.notify)}"
  query = "avg(last_1h):system.disk.in_use{role:mssql-datawarehouse} by {device,host} > 0.95"
  include_tags   = true}
The few main concepts for the main.tf file:
-
We will pass in
datadog_api_keyanddatadog_app_keyvia the Terraform command line so we don’t have these in our git repository -
The application owner and application name are being pulled from the variables provided in
terraform.tfvars. This means if the team that owns the application changes, we can simply update it once insideterraform.tfvarsand it updates across all of our checks. -
As we decided
notifywould be a list (an array), we are using one of the Terraform built in interpolation functions tojoin. This joins each item in the list with a space and puts it inside the message so Datadog can notify multiple destinations. -
We give each
datadog_monitorresource a unique name (eg.common_free_diskanddatawarehouse_free_disk). This is how Terraform can keep track of the resource and allow us to change the Datadog monitornameetc.
Running Terraform#
Now we have our files setup, we can run Terraform.
cd mssqlterraform plan -var datadog_api_key="xxxxx" -var datadog_app_key="xxxxx"Terraform will now tell you what actions will be taken against Datadog.

If you are happy with what it is going to do:
terraform apply -var datadog_api_key="xxxxx" -var datadog_app_key="xxxxx"
With that, you should now have your monitors created in Datadog.

Setting Environment Variables for Terraform#
If you don’t want to have to pass in the datadog variables in each time, you can set the following environment variables:
# Linuxexport TF_VAR_datadog_api_key=xxxxxxexport TF_VAR_datadog_app_key=xxxxxx# Windows - Current Session$env:TF_VAR_datadog_api_key = "xxxxxx"$env:TF_VAR_datadog_app_key = "xxxxxx"
# Windows - Permanently[Environment]::SetEnvironmentVariable("TF_VAR_datadog_api_key", "xxxxxx", "User")[Environment]::SetEnvironmentVariable("TF_VAR_datadog_app_key", "xxxxxx", "User")Types of Datadog Monitors#
Datadog provides many types of possible monitors you can create including host, metric, process etc.
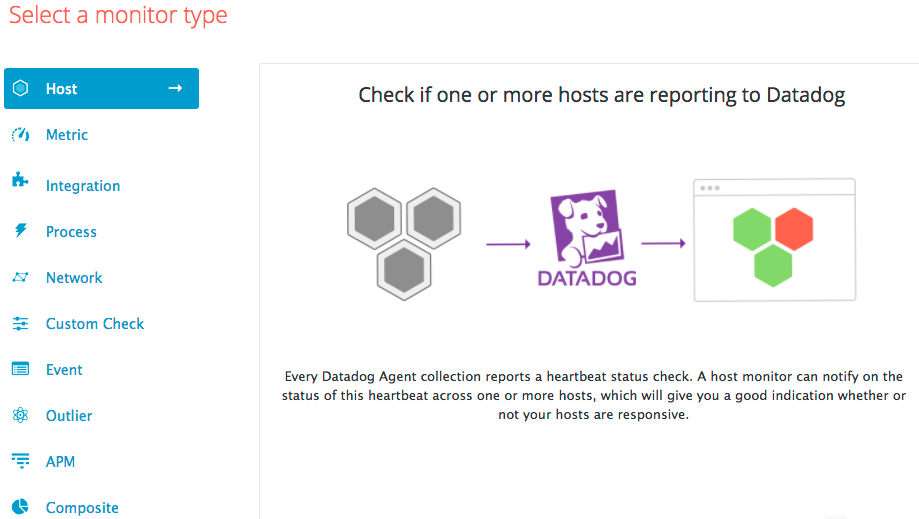
Creating monitors for all of them via Terraform requires knowing the query behind the monitor. These queries match up with the Datadog Monitor API.
Here are a few examples:
-
Type:
metric alert- Query:
avg(last_1h):system.disk.in_use{role:mssql-common} by {device,host} > 0.75 - Screenshot
- Query:
-
Type:
service check- Query:
'process.up'.over('role:sensu_server','process:redis-server').by('host','process').last(2).count_by_status() - Screenshot
- Query:
-
Type:
query alert- Query:
avg(last_2h):anomalies(sum:order.count{environment:production}.as_rate(),'adaptive', 2, direction='below') >= 0.5 - Screenshot
- Query:
-
Type:
service check- Query:
'http.can_connect'.over('environment:production','url:http://www.google.com').last(4).count_by_status() - Thresholds:
thresholds {critical = 3}
- Query:
Wrapping Up#
Terraform is an awesome way to automate your infrastructure and services out of code. Using Terraform to provision Datadog makes it easy to standardize, re-use and update your monitors quickly and easily.
The most important part of using Terraform is the upfront planning. This entails splitting resources into logical groups so the blast radius is small if something does explode.
I created a datadog-terraform-example repository with the code from this blog to get you started.
Good luck automating your Datadog!