Semantic versioning is the best known and most widely adopted convention for versioning software. If you aren’t familiar with it, read up on it before continuing.
Once you start implementing semantic versioning for a project, you realize that you have just given yourself a small check list of items to go through for every release:
-
Look through the commits since last release and determine if this will be a major, minor or patch release
-
Decide on the new version number based on the changes and the current version number
-
Name your artifacts with the new version number and store them somewhere, for example using Github Releases or uploading them to a NuGet repository
-
Keep a changelog so your users know what is different between versions of your software
Let’s have a look how we can avoid having to go through a check list for every release, by handling this automatically in our Continuous Integration tool.
📢 Want to know when more posts like this come out? Follow me on Twitter: @MattHodge 📢
Automating using semantic-release#
Semantic-release is a tool which can help us automate our whole release workflow, including determining the next version number, generating the release notes and publishing the package.
It is a Node.js command line tool, but it can be used to automate the semantic versioning of projects of any language.
It does so with the use of several plugins.
Plugin - commit-analyzer#
The commit-analyzer plugin parses commit messages and determines if a new release should be made, and whether it should be a Major, Feature or Patch release.
The default configuration is to use the AngularJS commit message format. Let’s have a look at some example commit messages:
fix: fix timeout when creating environmentsThe above commit message would be a Patch Release, for example 1.0.1.
feat(resource): add new argument to environment resourceThe above commit message would be a Feature Release, for example 1.1.0.
You can also include a optional section of the code you changed in parentheses, in this case I am changing a resource.
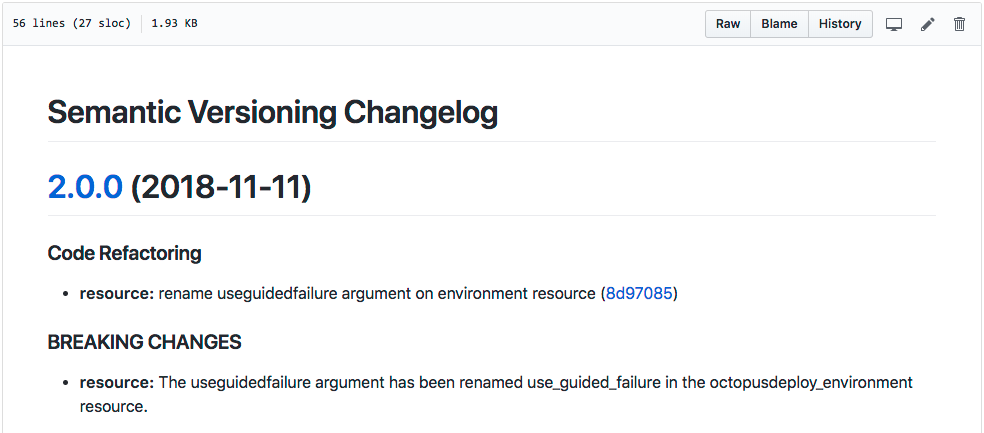
refactor(resource): rename useguidedfailure argument on environment resource
BREAKING CHANGE: The useguidedfailure argument has been renamed use_guided_failure in the octopusdeploy_environment resource.
The above commit message would be a Major Release as it has a breaking change, for example 2.0.0.
If you like, you can also implement your own commit parsing methods.
Plugin - release-notes-generator, changelog & git#
The release-notes-generator will generate a changelog based on the commit messages. You can then use the changelog plugin to create or update a CHANGELOG.md file.
Using the refactor commit above as an example, the following changelog would be generated.
This generated CHANGELOG.md needs to be checked back into the git repository, which is where the git plugin comes in.
Plugin - github#
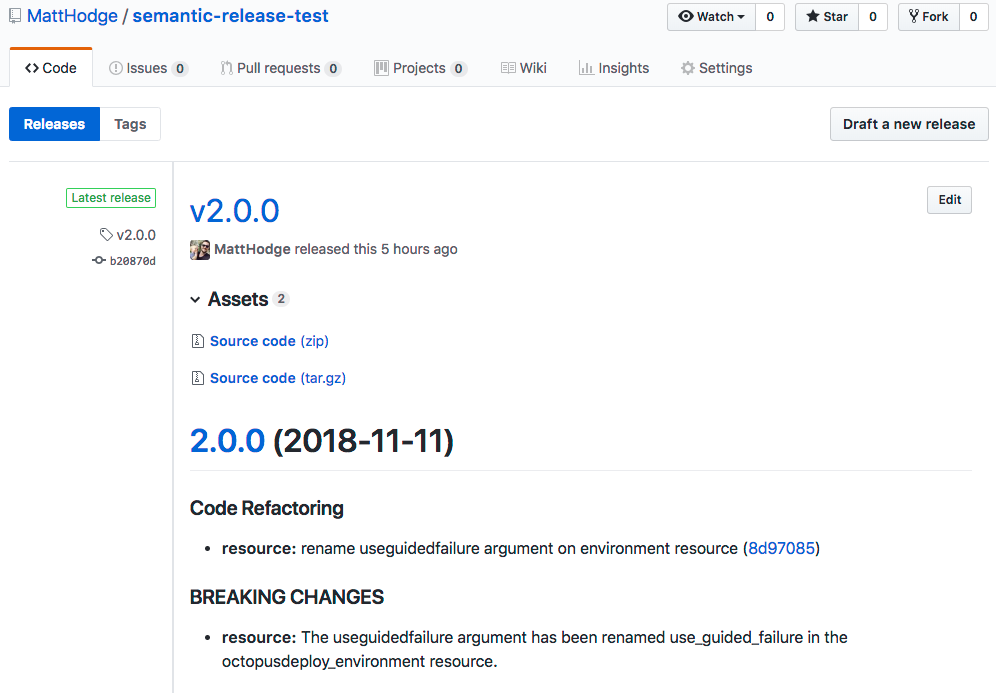
The github plugin can create GitHub releases and comment on issues the release closes them.
Using the refactor commit above as an example, the following GitHub release would be created.
Plugin - exec#
The exec plugin allows you to execute any arbitrary command at the different stages of a release.
This allows you to use semantic-release with any repository or language you wish.
For example, you could use the prepareCmd to generate release artifacts and a publishCmd to push them to an artifact repository like NuGet.
You also get access to variables like ${nextRelease.version} which you can pass to your scripts / commands. You can find all of the available variables in the JavaScript Developers Guide.
Installation#
Now that you have an idea of how semantic-release and its plugins work, its time to set them up on our repository.
Most of the documentation for semantic-release is very specific to NPM packages, but it can work with any type of repository and software.
For the rest of this guide I will assume you have some familiarity with Node.js and have it at least version 8.3 installed.
Install semantic-release and the plugins we need via NPM. We will install them globally.
npm install -g semantic-release \ @semantic-release/changelog \ @semantic-release/commit-analyzer \ @semantic-release/exec \ @semantic-release/git \ @semantic-release/release-notes-generatorConfiguration#
With the tool installed, now we need to setup a configuration file. Create a .releaserc file in the root of your repository.
The following is configuration for my Terraform provider repository:
{ "branch": "master", "plugins": [ "@semantic-release/commit-analyzer", "@semantic-release/release-notes-generator", [ "@semantic-release/changelog", { "changelogFile": "CHANGELOG.md", "changelogTitle": "# Semantic Versioning Changelog" } ], [ "@semantic-release/exec", { "prepareCmd": "./prepare-release.sh ${nextRelease.version}" } ], [ "@semantic-release/git", { "assets": [ "CHANGELOG.md" ] } ], [ "@semantic-release/github", { "assets": [ { "path": "dist/**" } ] } ] ]}The two parts of the configuration file we are using are:
-
branch- chooses which git branch to create releases from. -
plugins- an array of plugins to load. The plugins will be executed in the order they are defined. You can also define some configuration for each plugin as I have done above.
You can read more details about the configuration file page of the semantic-release documentation.
Create and set a GitHub token#
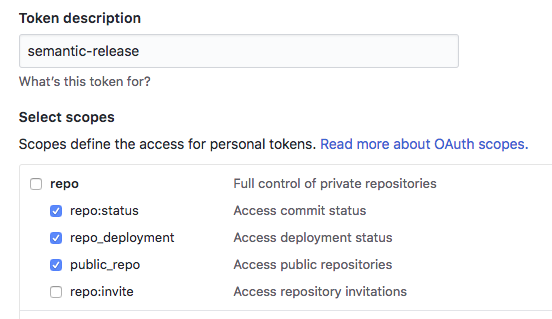
We need to create a GitHub token to allow semantic-release to create GitHub releases.
Follow the steps here to create one.
You will need to give the following permissions:
Copy the token and set it as the GITHUB_TOKEN environment variable.
export GITHUB_TOKEN=PUT-YOUR-TOKEN-HERERunning locally#
Ideally, you will run semantic-release inside a Continuous Integration (CI) tool. Let’s test it out locally first though.
I opened a repository of mine and ran the following command:
npx semantic-release
# You can also run it with the --debug flag for more details.
When running locally, it will detect that its not running in a CI tool and run in dryrun mode.
You will see all the configuration load and an output like this:

Let’s create a commit and see what happens.
# Add a test file and committouch testfile.txtgit add testfile.txtgit commit -m "feat: add a test file"
# Rerunnpx semantic-release
This time we see the changelog is generated and a new release would be created:

😍 Pretty awesome right!
Let’s say I already had a version that was released of my project using my old manual method, how would I have semantic-release continue on from there?
# Find the hash of the latest changegit log -2 --oneline
# Returns:# f3cd02e (HEAD -> master) feat: add a test file# 6548458 (origin/master, origin/HEAD, 1541972003) Update Builds
# Add a tag to the commit before our change, lets say it was version 1.5.0git tag v1.5.0 6548458
Now we are in-line with our previous release 😎.

Building your release#
Once semantic-release has decided a new version needs to be created, and generated a version number for you, we need a way to trigger a build of our software.
This is where the exec plugin comes in.
For example, using the following option:
{ "plugins": [ [ "@semantic-release/exec", { "prepareCmd": "./prepare-release.sh ${nextRelease.version}" } ] ]}When ever the prepare step is run by semantic-release, it will execute the prepare-release.sh script, passing the version of the new release with ${nextRelease.version}.
In this step I could, for example:
- Generate a binary from my repository
- Add the binary to a zip file
- Have the zip files name containing the semantic version for my release
- Put it in a folder to be pushed as a Github release with the
githubplugin - Publish it to an artifact repository, for example a NuGet feed
The options here are endless.
:white_check_mark: The
preparestep does not run in dry run mode. You will need to run it in CI to get this step to trigger.
Get your build running in CI#
Now we have all the pieces together, we want to start the build using a build server.
This part is now pretty easy. You just need to:
-
Make sure you have at least Node.js 8.3 installed
-
Check the
.releasercinto the root of your repository -
Install the required NPM packages from the Installation section of the article, and any other plugins you require
-
Set the
GITHUB_TOKENenvironment variable (as a secret 🤫) -
As part of your build process, run the
npx semantic-releasecommand after all your tests have passed successfully and you are ready to release
Conclusion#
Following a semantic release process doesn’t have to mean manual work. With the ground work set using semantic-release, you can automate all this work for ANY type of project.
Go and get automating ⭐!