After reading Automating with Jenkins and PowerShell on Windows Part - 1, you should have a grasp on the basics of Jenkins and be excited to start doing more automation!
Let’s start reaching out into our network with Jenkins and take actions on remote machines.
Jenkins provides a means to do this, which is to install a Jenkins agent onto each machine you want to reach out to. This is a decent option, but instead lets use PowerShell’s built-in remoting features. This will save us having to install agents on all our remote systems and means we can keep complexity down.
If you are new to PowerShell remoting, you will be able to follow along, but I recommend reading the free eBook Secrets of PowerShell Remoting to get up to speed.
📢 Want to be notified when I post more like this? Follow me on Twitter: @MattHodge 📢
Using SSL on the Jenkins Web Interface#
As we will be working with credentials inside Jenkins, first let’s beef up security by installing a SSL certificate on the Jenkins web interface.
We will use OpenSSL to generate a self-signed SSL certificate, preventing any passwords entered into the Jenkins web interface from going over the network in plain text.
- On your workstation machine, download OpenSSL from http://slproweb.com/products/Win32OpenSSL.html. At the time of writing, the latest version was v1.0.2f - so I grabbed the
Win64 OpenSSL v1.0.2f Light installer. - Run the installation. If you get a Visual C++ 2008 error, use the link on the OpenSSL page to download and install it on your machine. The certificate will not generate correctly without it.
- Once you start the installation, choose the option The OpenSSL binaries (/bin) directory.
- Once the installation has completed, open a PowerShell prompt and run the following commands
# Enter the bin directory inside the OpenSSL install foldercd C:\OpenSSL-Win64\bin
# Generate a self-signed SSL certificate. Be sure to update your paths if required.openssl req -newkey rsa:4096 -nodes -sha256 -keyout C:\temp\jenkins.key -x509 -days 365 -out C:\temp\jenkins.crt -config C:\OpenSSL-Win64\bin\openssl.cfg- Move the
jenkins.keyandjenkins.crtfiles from your workstation to a location on the Jenkins server, for exampleC:\SSL - Switch over to the Jenkins server, open a PowerShell and run the following
# Stop the Jenkins ServerStop-Service -Name Jenkins
# Edit the Jenkins configuration filenotepad 'C:\Program Files (x86)\Jenkins\jenkins.xml'- Inside the
jenkins.xmlfile, update startup argument in the<arguments>tag. You will start with something like this:
<arguments>-Xrs -Xmx256m -Dhudson.lifecycle=hudson.lifecycle.WindowsServiceLifecycle -jar "%BASE%\jenkins.war" --httpPort=8080</arguments>- Change it to the following, making sure to use the settings applicable to your installation (ports, SSL certificate location). The
—httpPort=-1is required by Jenkins.
<arguments>-Xrs -Xmx256m -Dhudson.lifecycle=hudson.lifecycle.WindowsServiceLifecycle -jar "%BASE%\jenkins.war" --httpPort=-1 --httpsPort=443 --httpsCertificate=C:/ssl/jenkins.crt --httpsPrivateKey=C:/ssl/jenkins.key</arguments>- Save the
jenkins.xmlfile and start the Jenkins service again:
# Start the Jenkins ServerStart-Service -Name JenkinsFrom your browser, hit the Jenkins web interface on the port you specified and you will be in business. (Remember to put https:// in front!)
Configure the Jenkins Server for Remoting and Script Execution#
Next up, we need to allow the Jenkins server to access machines on the network via PowerShell Remoting.
To do this, we need add the hosts we plan remotely managing to the WS-Man trusted host lists. The method you choose will depend on your environment.
# Get a list of trusted hostsGet-Item WSMan:\localhost\Client\TrustedHosts
# Note that these commands don't create a list of trusted hosts, it simply replaces the trusted host with what you set via the command. If you need to add multiple hosts, they need to be comma seperated
# Trust all computers in a domainSet-Item WSMan:\localhost\Client\TrustedHosts *.contoso.com
# Turst a single machineSet-Item WSMan:\localhost\Client\TrustedHosts -Value myserver
# Add another single machine$trustedHosts = (Get-Item WSMan:\localhost\Client\TrustedHosts).valueSet-Item WSMan:\localhost\Client\TrustedHosts -Value "$trustedHosts, mynextserver"
# Trust an IP address rangeSet-Item WSMan:\localhost\Client\TrustedHosts -value 192.168.10.*
# Trust all remote machines (not recommended)Set-Item WSMan:\localhost\Client\TrustedHosts *
We also may want to have Jenkins execute PowerShell script files, so we will set the PowerShell execution policy of the Jenkins server. We will configure both the x64 and x86 execution policies.
Set PowerShell Execution Policy PowerShell#
We will set the execution policy for x64 and x86 PowerShell
x86#
- Run an Administrative Command Prompt
- Enter the following command:
%SystemRoot%\syswow64\WindowsPowerShell\v1.0\powershell.exe - In the
PSprompt, enter:
Set-ExecutionPolicy RemoteSigned -Forcex64#
- Run an Administrative PowerShell Prompt as normal
- Enter in:
Set-ExecutionPolicy RemoteSigned -ForceInstall a new Plugin#
We will install the EnvInject Plugin which allow us to inject some stored environment variables into our build (including passwords).
- In the Jenkins UI choose Manage Jenkins > Manage Plugins
- Click on the Available tab and type into the filter box
EnvInject. - Put a tick in the install column for the EnvInject Plugin and click Download now and install after restart.
- Click Restart Jenkins when installation is complete and no jobs are running.
Passing Credentials to PowerShell Jobs#
There are two ways that you can hand credentials to jobs in Jenkins
- Ask for them as a parameter when running a Jenkins job - This is useful for jobs that are run manually. An example would be a job which remotes to a machine when it is part of a workgroup and then joins the machine to a the corporate domain. You will need to pass in both the local credentials of the machine (when it is off the domain), as well as your domain credentials to join the machine to the domain. The local or domain credentials might change between when you need to run the job, so it makes sense to pass them in as parameters to the job.
- Store them in Jenkins and send them to your job as an environment variable - This is useful for jobs that you will be running on a schedule. Usually this would be a domain service account as opposed to a users login credentials. An example job restarting a troublesome service each night on a schedule; you obviously would want this to occur without any prompts for credentials.
Parameterizing a Jenkins Job with Credentials#
In this example, we are going restart a service on a remote machine.
Remember that Jenkins makes the parameters available using environment variables. ComputerName and Username already exists as environment variables, so I am not using the standard naming convention for the parameters you would use inside PowerShell.
- From the Jenkins web interface, click New Item.
- For the job name, put in
Restart Service Remotely. Select Freestyle project. - Tick This build is parameterized. Add the following parameters:
- Type:
String Parameter - Name:
Computer - Description:
Name or IP Address of the remote machine - Type:
String Parameter - Name:
User - Description:
Username to connect to the remote machine - Type:
Password Parameter - Name:
Password - Description:
Password to connect to the remote machine
- Type:
- Scroll down, and under Build, choose Add build step and select Windows PowerShell. Inside this textbox is where we can put in our PowerShell script remote to the machine and restart the service.
# Ensure the build fails if there is a problem.# The build will fail if there are any errors on the remote machine too!$ErrorActionPreference = 'Stop'
# Create a PSCredential Object using the "User" and "Password" parameters that you passed to the job$SecurePassword = $env:Password | ConvertTo-SecureString -AsPlainText -Force$cred = New-Object System.Management.Automation.PSCredential -ArgumentList $env:User, $SecurePassword
# Invoke a command on the remote machine.# It depends on the type of job you are executing on the remote machine as to if you want to use "-ErrorAction Stop" on your Invoke-Command.Invoke-Command -ComputerName $env:Computer -Credential $cred -ScriptBlock { # Restart the W32Time service Restart-Service -Name W32Time}- Run a build and confirm the service restarts on the remote server, the best way to do this is to check the event logs.
- (Optional Verification) - Edit the PowerShell build step and enter in a service name that doesn’t exist so you can confirm the build will fail if there is an error in executing the commands on the remote system.
If you are using a domain account to access the machine, use DOMAIN\YourUserName. If you are using a non-domain account as your username, in the User box put \YourUserName. Entering it in without the leading backslash will cause the job to fail.
Storing Credentials in Jenkins#
In this example, we are going to make a job that creates a text on a remote machine. We don’t want to have to enter our username and password each time we run a job, so we will store our credentials in Jenkins and use them in our PowerShell job.
There will be two parameters - one for name of the text file and one for its contents. Normally you wouldn’t have parameters on a job where you are pulling credentials with Jenkins, which would allow the job to run without intervention. In our case we are doing it so we can see how to pass multiple Jenkins parameters into a remote PowerShell session.
A best practice would be to create a dedicated service account for performing the build. Using your own credentials isn’t a great idea as your password can change. Additionally, your account may have far more privileges than are needed to do a simple remote task, which is a bad security practice.
- In the Jenkins UI choose Manage Jenkins > Configure System
- Scroll down until you see the Global Passwords section and click Add
- Enter the Name for the password. This is not the username - this is the name of the environment variable that will be used to store the password in when it is used inside the build. Enter in the password and click Save.

Now that the password is now stored in Jenkins, we will create the build.
- From the Jenkins web interface, click New Item.
- For the job name, put in
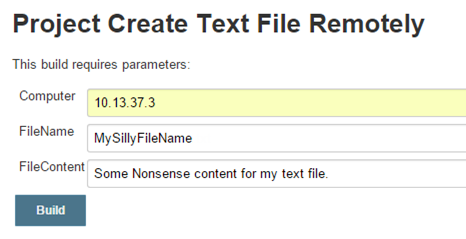
Create Text File Remotely. Select Freestyle project. - Tick This build is parameterized. Add the following parameters:
- Type:
String Parameter - Name:
Computer - Description:
Name or IP Address of the remote machine - Type:
String Parameter - Name:
FileName - Description:
Name of the text file file to create - Type:
String Parameter - Name:
FileContent - Description:
Content text for the file
- Type:
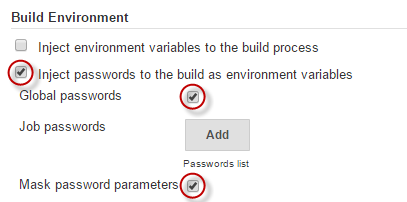
- Scroll down, under Build Environment, tick Inject passwords to the build as environment variables and then Global Passwords. This will provide the environment variable from Global Password that we configured earlier. The option Mask password parameters will make sure that the variable is masked, so for instance if you did a Write-Output command against it, it would not show in the Jenkins Console Output screen.

- Scroll down, and under Build, choose Add build step and select Windows PowerShell. Inside this textbox is where we can put in our PowerShell script.
# Ensure the build fails if there is a problem.# The build will fail if there are any errors on the remote machine too!$ErrorActionPreference = 'Stop'
# Create a password variable using the stored password from the Jenkins Global Passwords$SecurePassword = $env:PasswordForHodge | ConvertTo-SecureString -AsPlainText -Force
# If remoting to a machine with domain credentials, use "DOMAIN\YourUserName"# If remoting to a machine on a workgroup, use "\YourUserName"$User = "\Hodge"
# Create a PSCredential Object using the a hardcorded username and and $SecurePassword variable
$cred = New-Object System.Management.Automation.PSCredential -ArgumentList $User, $SecurePassword
# Build an object to store variables to send remotley$objForRemote = @{}
# Add build paramters to the object$objForRemote.FileName = $env:FileName$objForRemote.FileContent = $env:FileContent
# (Optional) I like to output the $objForRemote variable so I can confirm by looking at the Jenkins Console Output of the build I set my parameters correctly.Write-Output $objForRemote
# Invoke a command on the remote machine, sending $objForRemote to the ArgumentList paramater.# It depends on the type of job you are executing on the remote machine as to if you want to use "-ErrorAction Stop" on your Invoke-Command.Invoke-Command -ComputerName $env:Computer -Credential $cred -ArgumentList $objForRemote -ScriptBlock {    # Get the arguments passed to the remote session into the same variable name for ease of use    $objForRemote = $args[0]
    # Create Temp Directory    if (-not(Test-Path -Path 'C:\temp'))    {        New-Item -Path 'C:\temp' -ItemType directory    }
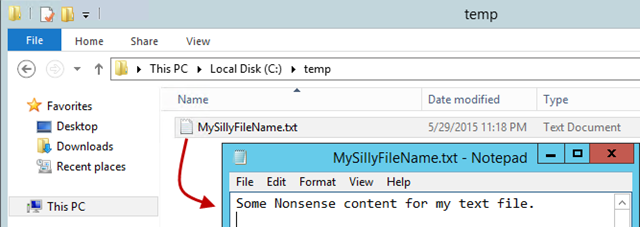
# Using the environment variables exposed by the Jenkins job Set-Content -Path "C:\temp\$($objForRemote.FileName).txt" -Value $objForRemote.FileContent}- Save the build
Run the build#
From the Jenkins main screen, run the Create Text File Remotely build and enter the parameters.

Verify the build was successful and take a look on the remote system - the file should be there!

Conclusion#
The builds and scripts above will give you a good framework for creating and PowerShell Remoting jobs with remoting. The builds above as they are not overly useful, but they provide the building blocks needed to do some awesome automation in your environment.