My wife and I have joked many times that essentially we are just soundboards, saying the same things over and over again to our kids.
“Brush your teeth! Find your shoes! Did you pack your bag?”.
What if you could outsource your nagging to your smart home?
That’s what I set out to do. By creating a Home Assistant dashboard that turns the morning routine into a game, my kids now race to get their tasks done.
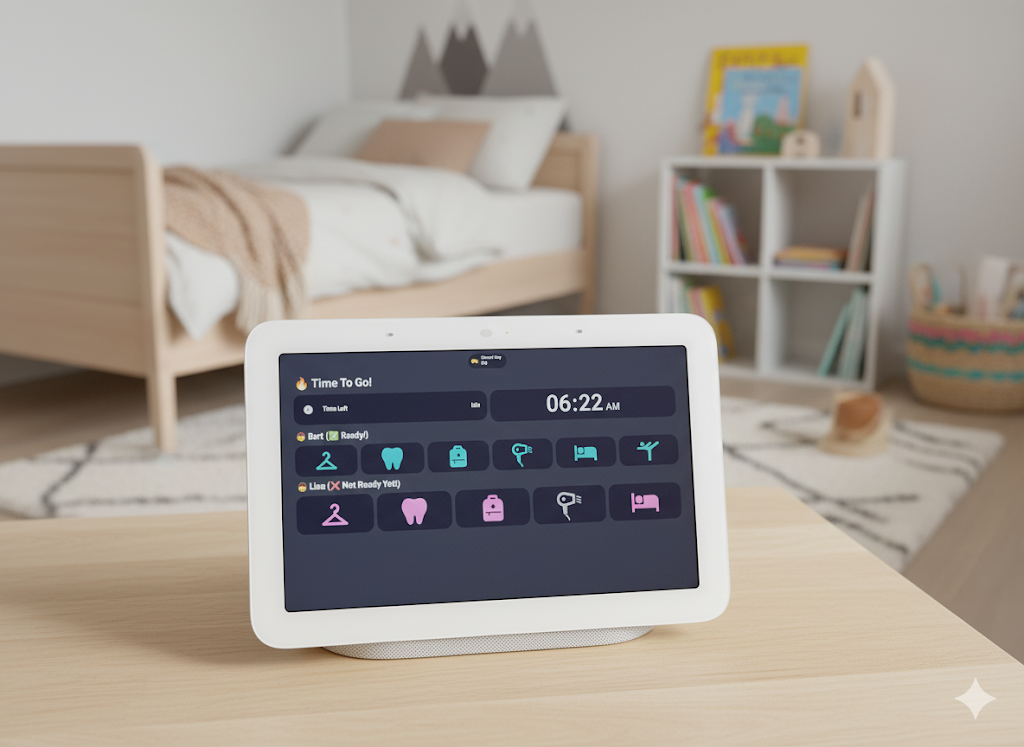
Here is what we are going to end up with:
In this guide, I’ll walk you through all the building blocks — from helpers and sensors to automations and dashboards — so you can piece it together step by step. By the end, you’ll be able to automate your nagging 🤘.
This guide assumes you are comfortable with editing YAML and adding custom integrations via HACS.
The Hardware#
I am using a Google Nest Hub as the display, but you can use any touch screen device that supports Home Assistant dashboards.
If you are using a Nest Hub:
- Install the Cast integration
- Make sure your Home Assistant instance accessible from the internet via
https
Once you install the integration, you can cast using the cast.show_lovelace_view action.
- action: cast.show_lovelace_view metadata: {} data: # Your Nest Hub's entity ID entity_id: media_player.nesthuba962 # eg. If your dashboard link is https://yourhomeassistant/nest-hub/0 # The path to your dashboard dashboard_path: nest-hub # The zero indexed view to show view_path: "0"Backend Building Blocks#
Creating the Checklist Items#
For each child, we need a list of items that need to be checked off (eg. brushing teeth, making bed, etc).
We will create input_boolean entities for each item.
-
Go to the Helpers page
-
Click Create Helper
-
Choose Toggle
-
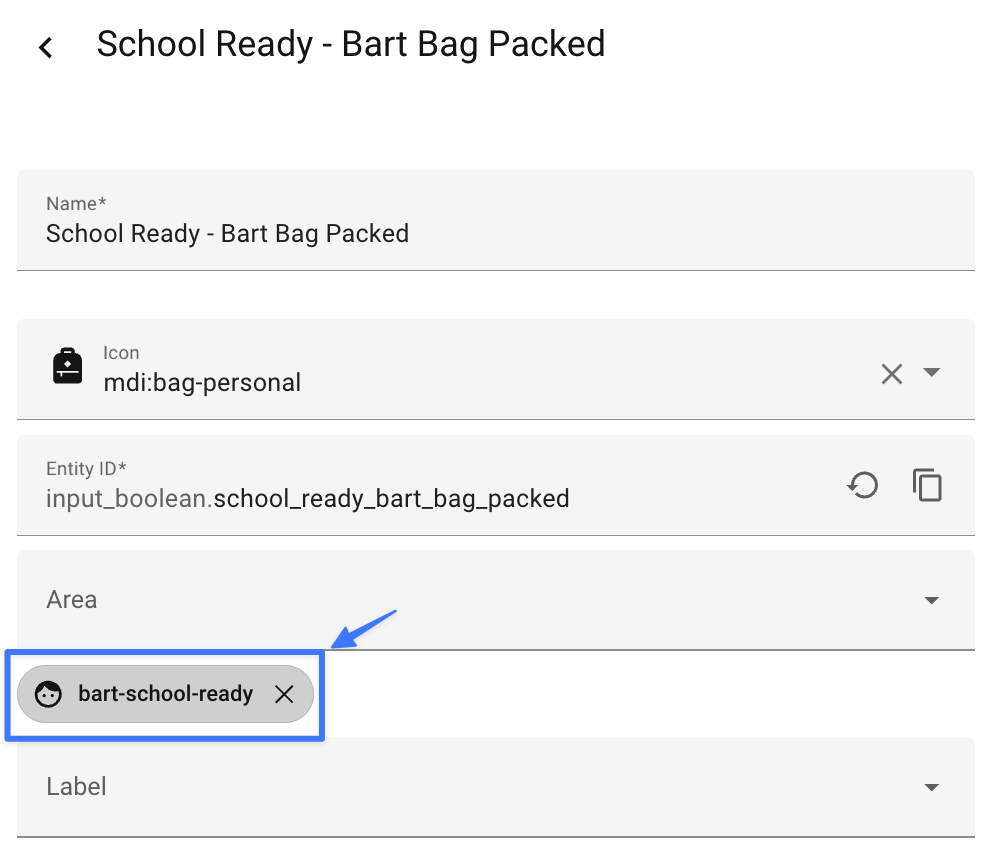
Give it a name and choose an icon. Make them easier to search with a prefix, something like
School Ready - Bart Bag Packed. -
Click on it and choose the Settings () icon.
-
Give it a label. If you have multiple children, make sure to have a label dedicated to each child. The label will be crucial for the automation and dashboard later.
- Repeat the process for each item on the checklist for each child.
Making Checklist Items Dynamic#
I had a use case where my son needed to pack his gym bag only 2 days a week.
As we are using labels to determine what is a checklist item, we can easily make them dynamic by adding or removing the label from the checklist entity.
Home Assistant itself does not have a way to add or remove labels from entities, but we can use the 👻 Spook add-on to do this.
Spook adds Label Management Actions that we can use for this:
homeassistant.add_label_to_entityhomeassistant.remove_label_from_entity
Follow the instructions in the Spook Documentation to get it installed.
We will use these actions in an automation later.
Tracking School Leaving Time#
We will add 2 helpers:
- one to store the time we want to leave for school
- one to act as a countdown timer used to display the time left until we need to leave for school
- Go to the Helpers page
- Click Add Helper
- Choose Date and/or Time
- Choose the Time option
- Give a name and an icon and click Submit
- Click on the helper and set the time you want to leave for school
- Note down the name of the helper (mine is
input_datetime.school_leaving_time)
Now for the countdown timer:
- Add another helper and choose Timer
- Give a name and an icon and click Submit
- Click on the helper and set the duration of the timer to the time you want to leave for school
- Note down the name of the helper (mine is
timer.school_departure_timer)

Binary Sensors For Ready States#
Once we have all our toggle helpers created, we can build a dynamic binary sensor for each child. This will track whether each child has completed their checklist.
We will do this using YAML in either our configuration.yaml or templates.yaml file (depending on your setup).
The function below:
- Uses
now()to trigger the template on each update every minute (otherwise it will only trigger when the state of the entities change. Since our entities will be dynamic, we need to refresh the list of entities on each update) - Uses
label_entitiesto get all the entities with the same label - Counts the number of entities that are
on - Counts the total number of entities
- If the number of entities that are
onis equal to the total number of entities, returnstrue, otherwise, returnsfalse
- binary_sensor: - name: "Bart is Ready For School" state: > {{ now() | expand(label_entities('bart-school-ready')) | selectattr('state', 'eq', 'on') | list | count == expand(label_entities('bart-school-ready')) | list | count }}
- name: "Lisa is Ready For School" state: > {{ now() |expand(label_entities('lisa-school-ready')) | selectattr('state', 'eq', 'on') | list | count == expand(label_entities('lisa-school-ready')) | list | count }}
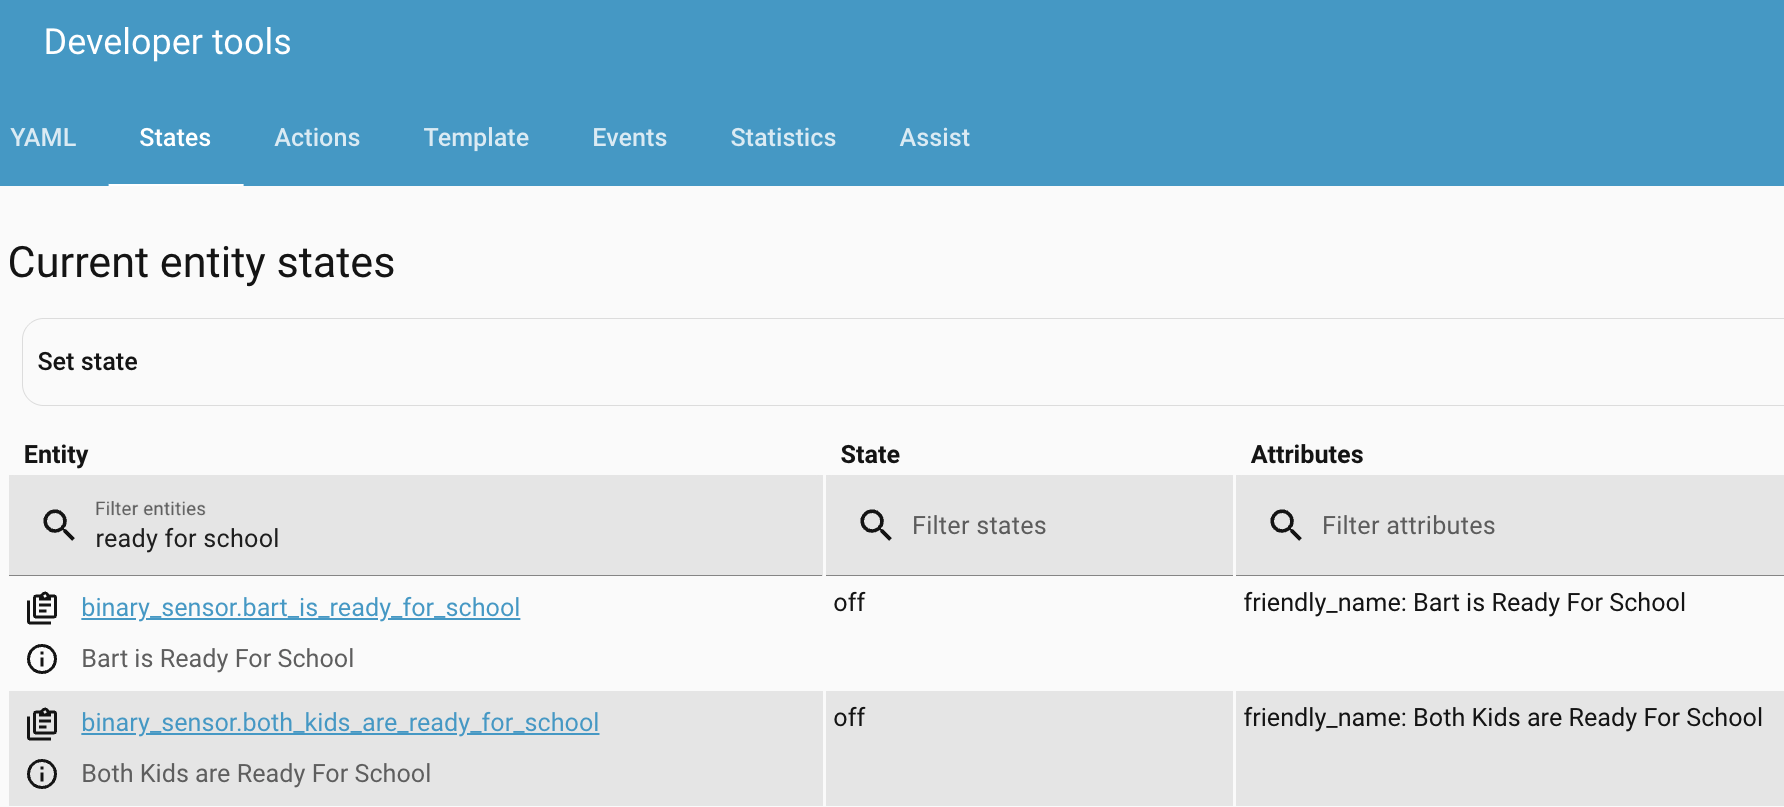
# Roll up each child's checklist completion into a single binary sensor - name: "Both Kids are Ready For School" state: > {{ is_state('binary_sensor.bart_is_ready_for_school', 'on') and is_state('binary_sensor.lisa_is_ready_for_school', 'on') }}Reload your YAML configuration to see the binary sensors in the States page.
Is It a School Day?#
To determine if its a school day or not, we can use the Workday integration.
- Go to the Integrations page
- Click Add Integration
- Add the Workday integration and choose the country
- Add any school holidays to the Add Holidays section
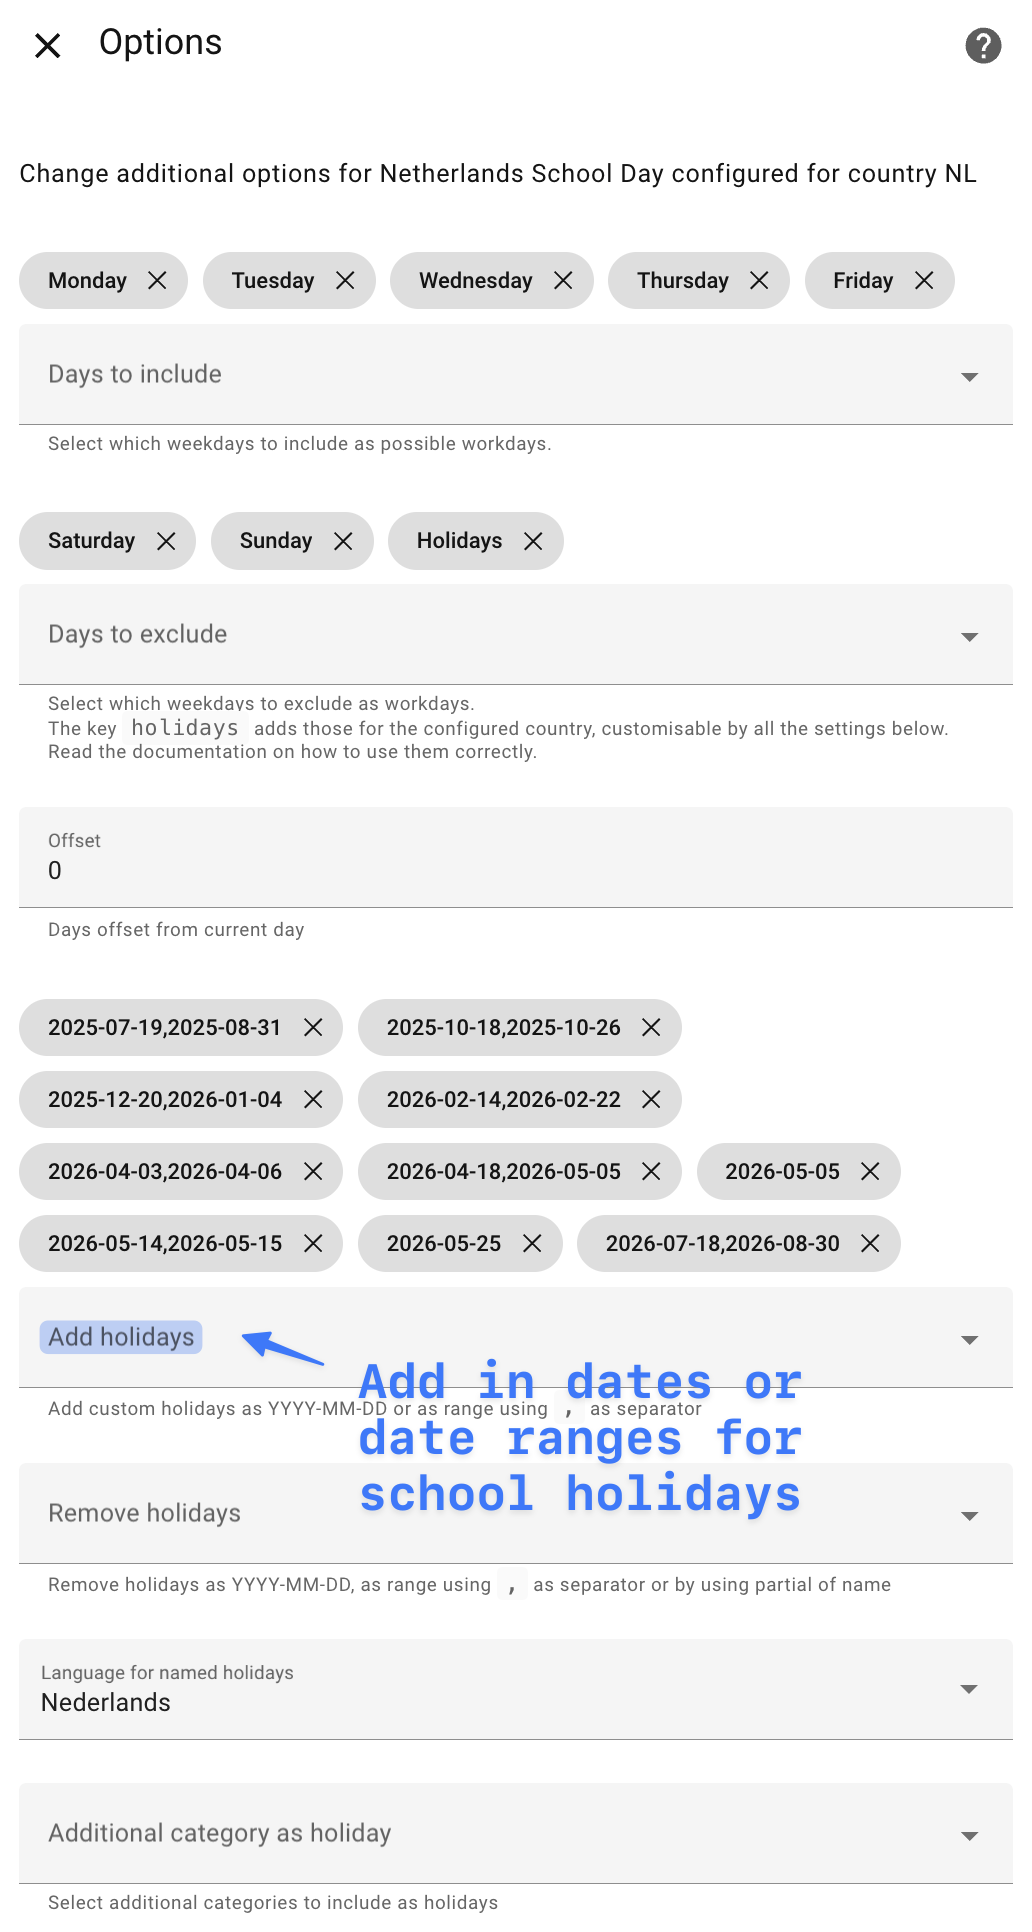
- Click Submit
- Note down the name of the binary sensor that is created (mine is
binary_sensor.netherlands_school_day)
A Daily Fact#
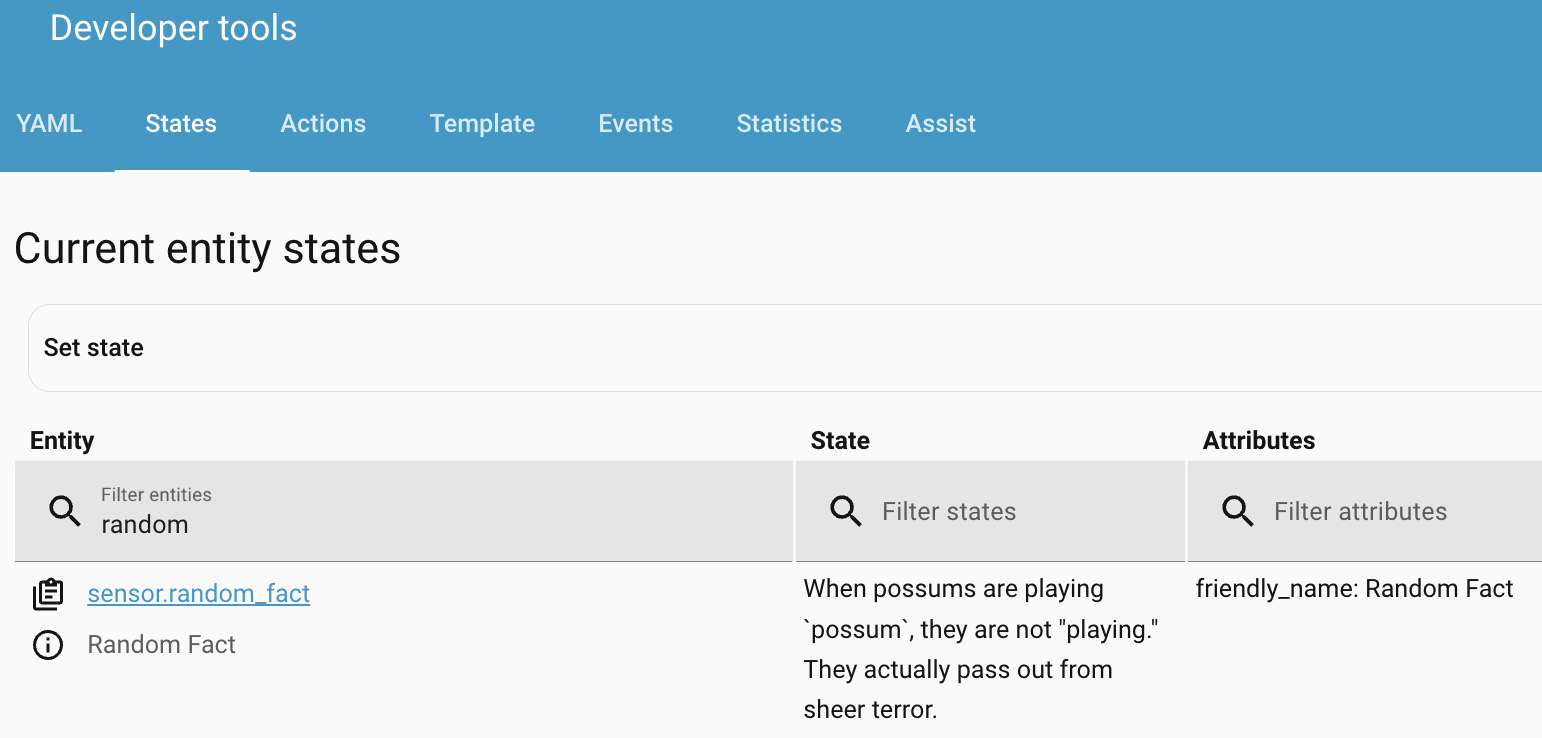
To keep the dashboard engaging, we can use a sensor that will display a daily fact.
We will use the Useless Facts API, querying it daily using a sensor.
Add it to your configuration.yaml or sensor.yaml file (depending on your setup).
- platform: rest name: "Random Fact" scan_interval: 86400 # Daily resource: https://uselessfacts.jsph.pl/api/v2/facts/random?language=en value_template: "{{ value_json.text }}"Reload your YAML configuration to see the sensor in the States page.
Alternative APIs are the Cat Facts API or the Dad Joke API.
Dashboard Building Blocks#
Additional Plugins#
We are going to need some custom lovelace plugins to add some style to our buttons, and handle loading them dynamically.
Click the name of the plugin to install it via HACS.
-
- Customizable buttons for your dashboard
- See custom-cards/button-card for documentation
-
- Dynamically generates card entities based on entity labels, keeping your dashboard up-to-date automatically
- See thomasloven/lovelace-auto-entities for documentation
-
- A progress bar display for timers
- See rianadon/timer-bar-card for documentation
 custom-cards/button-card
Dynamic Buttons#
To autogenerate buttons for each child, we can use the custom:auto-entities card, in combination with the custom:button-card custom card.
- type: custom:auto-entities card: type: horizontal-stack card_param: cards filter: include: - options: type: custom:button-card show_name: false show_icon: true color_type: icon state: - value: 'on' # Have a custom color for the on state color: '#00bcd4' - value: 'off' color: '#9E9E9E' # Use the label of the helper to filter the entities per child label: bart_school_ready grid_options: columns: fullTest it out by adding a label to one of the task entities and refreshing the dashboard.
Dynamic Markdown Titles#
We can use Markdown cards with template syntax to create dynamic titles.
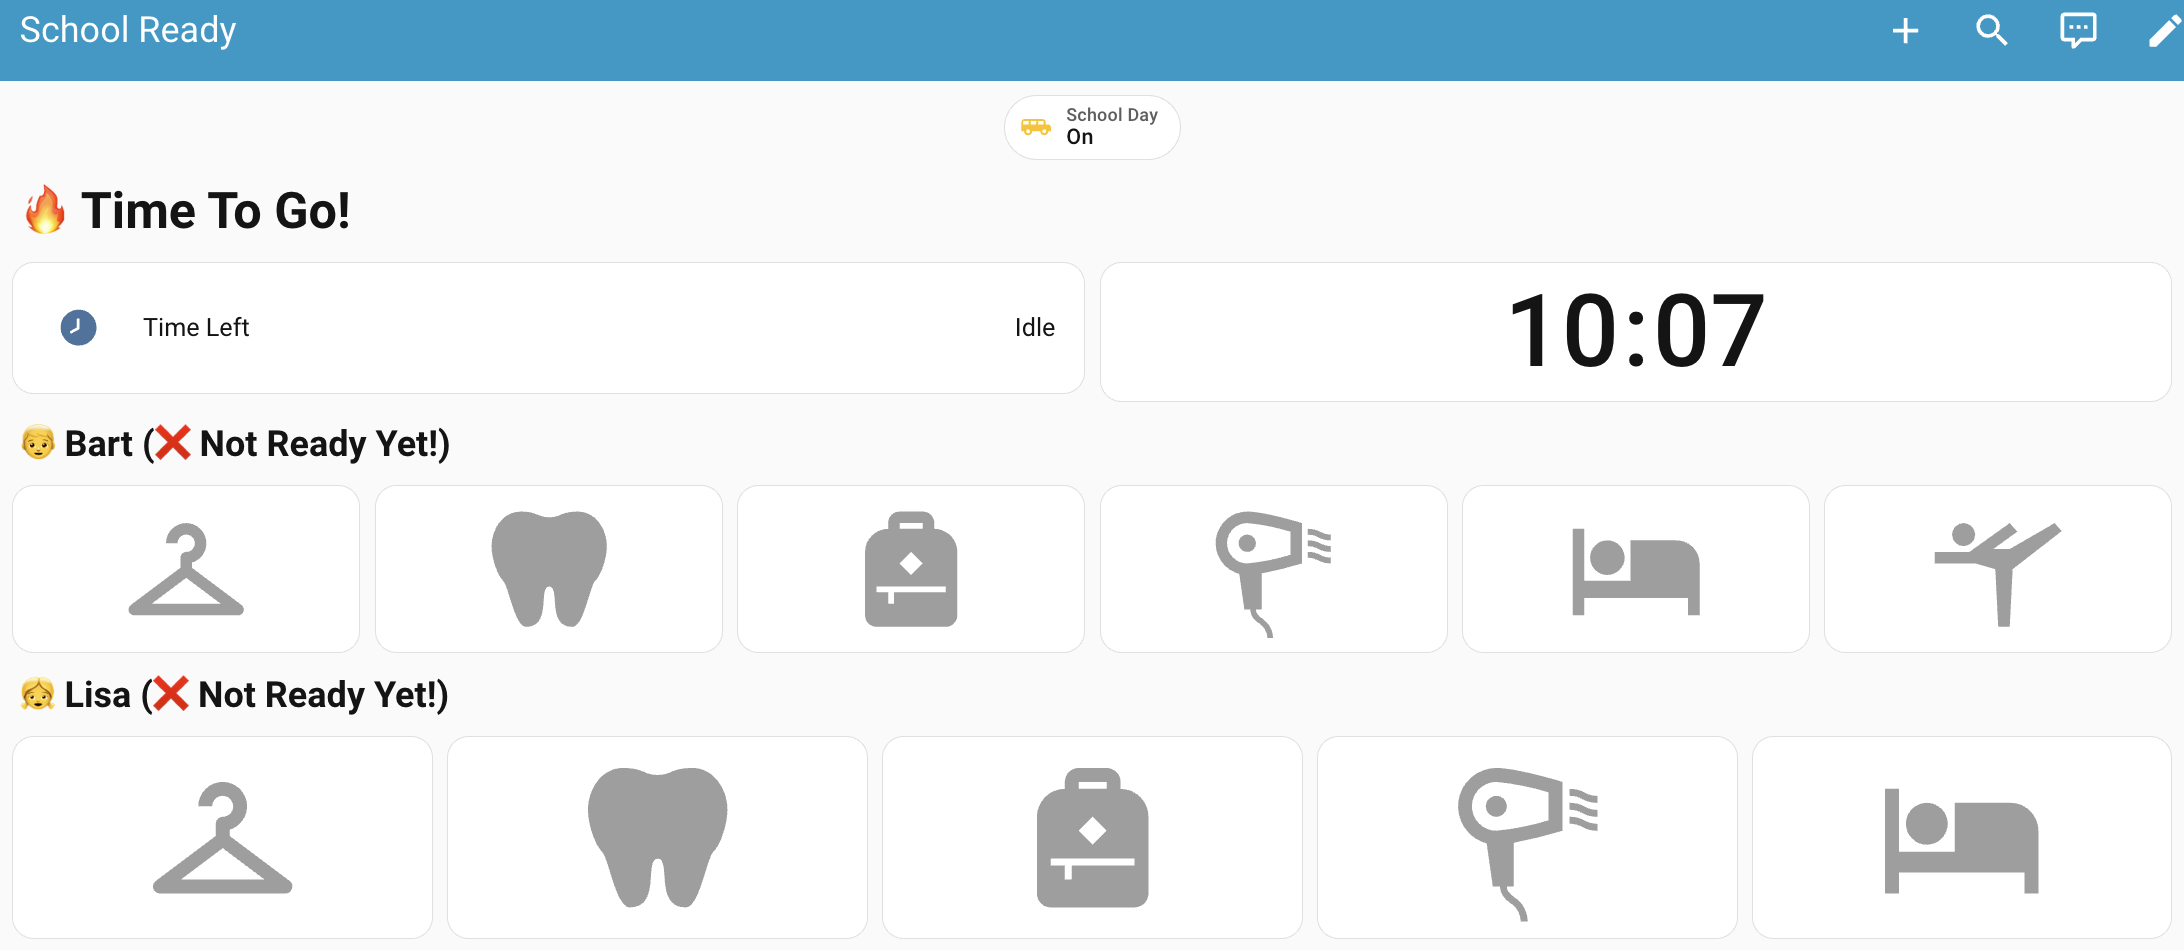
Child Is Ready#
We can use the is_state function on our binary_sensor entities to check if the child is ready for school (they’ve completed their checklist).
{% if is_state('binary_sensor.bart_is_ready_for_school', 'on') %} ## 👦 Bart (✅ Ready!){% else %} ## 👦 Bart (❌ Not Ready Yet!){% endif %}Header#
We can use the is_state template to check if it’s a school day or not, and if the departure timer is active or completed.
{% if is_state('binary_sensor.netherlands_school_day', 'off') %}# 🌴 It's Not a School Day{% else %}{% if is_state('timer.school_departure_timer', 'active') %}# ⏰ Get Ready For School{% else %}# 🔥 Time To Go!{% endif %}{% endif %}Countdown Timer#
We can use the custom:timer-bar-card card to display the countdown timer, which shows a progress bar based on the remaining time before we need to leave for school.
- type: custom:timer-bar-card entities: - entity: timer.school_departure_timer name: Time Left modifications: - remaining: '00:30:00' bar_foreground: green active_icon: mdi:run-fast - remaining: '00:20:00' bar_foreground: orange active_icon: mdi:run-fast - remaining: '00:10:00' bar_foreground: red active_icon: mdi:fire-alert bar_height: 50px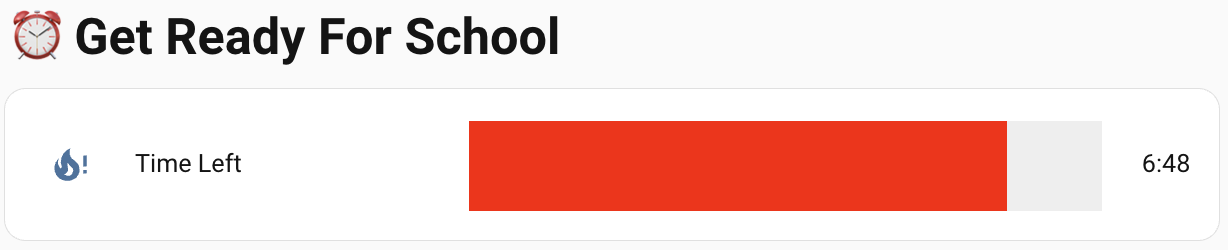
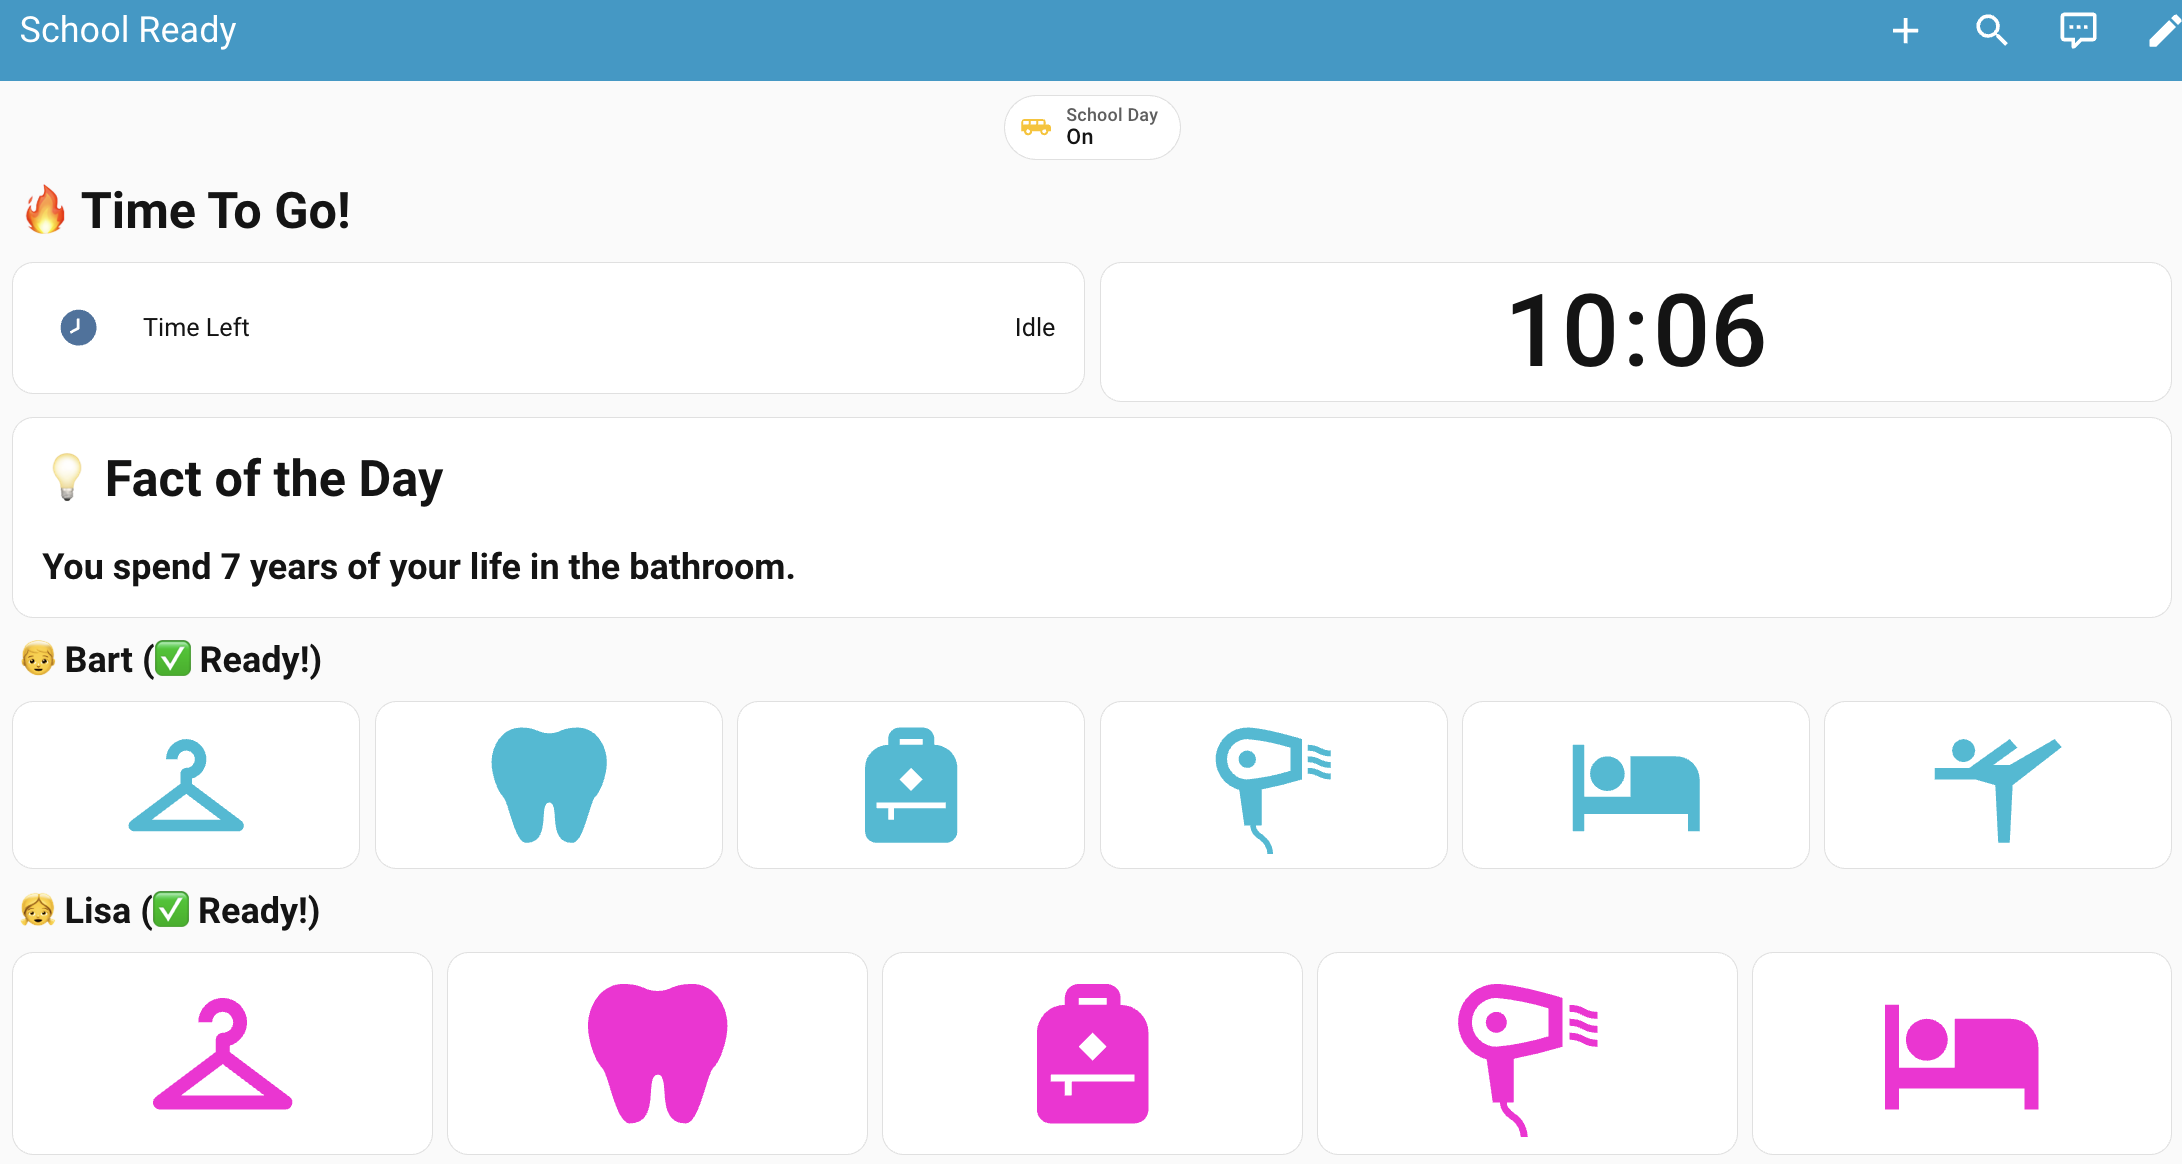
Daily Fact#
We will display the daily fact when both children are ready for school using a visibility condition.
- type: markdown  content: |-    # 💡 Fact of the Day
    ## {{ states('sensor.random_fact') }}  visibility:    - condition: state      entity: binary_sensor.both_kids_are_ready_for_school      state: 'on'
The Automation#
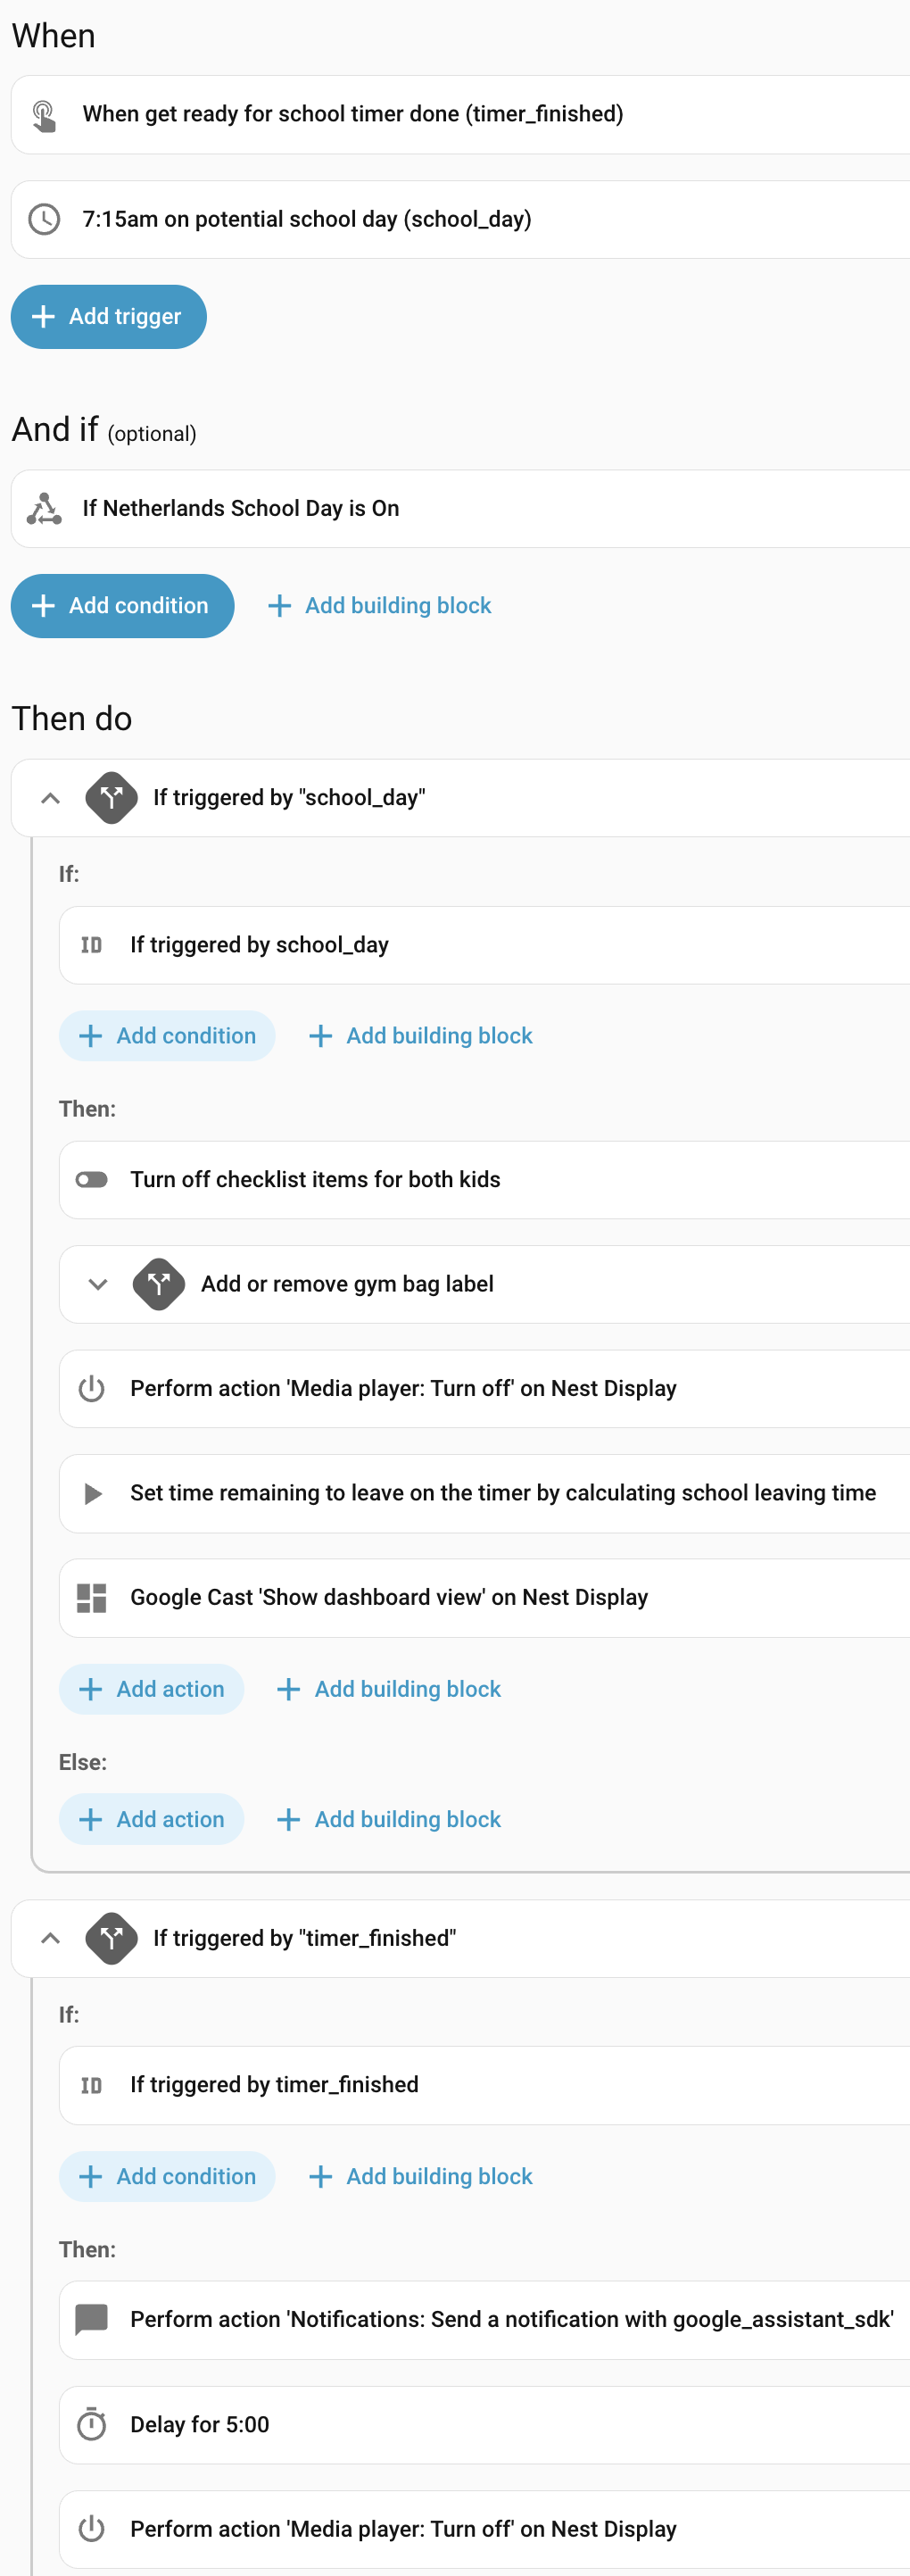
The automation has 2 sections, depending on the trigger. I will explain each section in plain English, then share the YAML.
Start Morning Automation (school_day)#
This part is the main “get ready” part of the automation.
- It resets all the checklist items that were marked as done the previous day
- On Tuesdays and Fridays, it adds a “gym bag” item to Bart’s checklist. On other school days, it removes it. This makes the checklist dynamic
- It turns off the Nest Hub to clear the screen and then starts a countdown timer until the scheduled departure time
- Finally, it displays the school readiness dashboard on the Nest Hub, so the kids can see their tasks and the countdown
Departure Automation (timer_finished)#
This part is triggered when the countdown timer from the first automation finishes.
- It sends a voice notification to Bart’s Nest device, saying, “It’s Time To Go To School! Get your shoes on!”
- Pauses for 5 minutes
- It turns off the screen
Overall Automation#
Automation YAML
alias: School Departure - Notify and Prepare Dashboardtriggers: # The time to show the dashboard - trigger: time at: "07:15:00" weekday: - mon - tue - wed - thu - fri # Set an id for the time of day trigger id: school_day alias: 7:15am on potential school day (school_day) # When the timer on the dashboard has finished counting down- event_type: timer.finished event_data: entity_id: timer.school_departure_timer trigger: event # Set an id for the timer finished trigger id: timer_finished alias: When get ready for school timer done (timer_finished)conditions: # Only run the automation on school days - condition: state entity_id: binary_sensor.netherlands_school_day state: "on"actions: # If triggered by "school_day", start the automation - alias: If triggered by "school_day" if: - condition: trigger id: - school_day # Turn off all items in the checklist then: - action: input_boolean.turn_off metadata: {} data: {} target: label_id: - lisa_school_ready - bart_school_ready # If it is a Tuesday or Friday, add the gym bag label to Bart's checklist - if: - condition: time weekday: - tue - fri then: - action: homeassistant.add_label_to_entity metadata: {} data: label_id: - bart_school_ready entity_id: - input_boolean.school_ready_bart_gym_back else: - action: homeassistant.remove_label_from_entity metadata: {} data: entity_id: - input_boolean.school_ready_bart_gym_back label_id: - bart_school_ready alias: Add or remove gym bag label # Turn off the Nest Hub. This clears the screen if anything was already showing. - target: entity_id: media_player.nesthuba962 action: media_player.turn_off data: {} enabled: true # Start the countdown timer using a dynamic duration, based on the school leaving time helper - action: timer.start metadata: {} data: duration: > {% set leaving_time = states('input_datetime.school_leaving_time') %} {% set now = now() %} {% set today_leaving = today_at(leaving_time) %} {% set time_diff = (today_leaving - now).total_seconds() %} {% if time_diff > 0 %} {{ time_diff | int }} {% else %} 0 {% endif %} target: entity_id: timer.school_departure_timer alias: >- Set time remaining to leave on the timer by calculating school leaving time # Cast the dashboard to the Nest Hub - action: cast.show_lovelace_view metadata: {} data: entity_id: media_player.nesthuba962 dashboard_path: nest-hub view_path: "0" # If triggered by "timer_finished", when it's time to go to school - alias: If triggered by "timer_finished" if: - condition: trigger id: - timer_finished then: # Send a voice notification to Bart's Nest - data: message: It's Time To Go To School! Get your shoes on! target: - bart action: notify.google_assistant_sdk # Wait 5 minutes - delay: hours: 0 minutes: 5 seconds: 0 milliseconds: 0 # Stop displaying the dashboard - target: entity_id: media_player.nesthuba962 action: media_player.turn_off data: {}mode: singleThe Final Dashboard#
Now we can put it all together in our final dashboard.
Full Dashboard YAML
views:  - title: School Ready    cards: []    type: sections    sections:      - type: grid        cards:          - type: markdown            content: |-              {% if is_state('binary_sensor.netherlands_school_day', 'off') %}              # 🌴 It's Not a School Day              {% else %}              {% if is_state('timer.school_departure_timer', 'active') %}              # ⏰ Get Ready For School              {% else %}              # 🔥 Time To Go!              {% endif %}              {% endif %}            grid_options:              columns: full            text_only: true          - type: horizontal-stack            cards:              - type: custom:timer-bar-card                entities:                  - entity: timer.school_departure_timer                    name: Time Left                modifications:                  - remaining: '00:30:00'                    bar_foreground: green                    active_icon: mdi:run-fast                  - remaining: '00:20:00'                    bar_foreground: orange                    active_icon: mdi:run-fast                  - remaining: '00:10:00'                    bar_foreground: red                    active_icon: mdi:fire-alert                bar_height: 50px              - clock_size: large                show_seconds: false                type: clock            grid_options:              columns: full          - type: markdown            content: |-              # 💡 Fact of the Day
## {{ states('sensor.random_fact') }} visibility: - condition: state entity: binary_sensor.both_kids_are_ready_for_school state: 'on' grid_options: columns: full - type: markdown content: |- {% if is_state('binary_sensor.bart_is_ready_for_school', 'on') %} ## 👦 Bart (✅ Ready!) {% else %} ## 👦 Bart (❌ Not Ready Yet!) {% endif %} text_only: true - type: custom:auto-entities card: type: horizontal-stack card_param: cards filter: include: - options: type: custom:button-card show_name: false show_icon: true color_type: icon state: - value: 'on' color: '#00bcd4' - value: 'off' color: '#9E9E9E' label: bart_school_ready grid_options: columns: full - type: markdown content: |- {% if is_state('binary_sensor.lisa_is_ready_for_school', 'on') %} ## 👧 Lisa (✅ Ready!) {% else %} ## 👧 Lisa (❌ Not Ready Yet!) {% endif %} text_only: true - type: custom:auto-entities card: type: horizontal-stack card_param: cards filter: include: - options: type: custom:button-card show_name: false show_icon: true color_type: icon state: - value: 'on' color: '#fc03d7' - value: 'off' color: '#9E9E9E' label: lisa_school_ready grid_options: columns: 48 rows: 2 column_span: 4 max_columns: 4 badges: - type: entity show_name: true show_state: true show_icon: true entity: binary_sensor.netherlands_school_day name: School Day icon: mdi:bus-schoolConclusion#
Hopefully I’ve given you the tools to get your kids out the door without all the nagging.
Enjoy the 5 minutes of extra time for enjoy your morning coffee ☕.