During the development of automation for your infrastructure, you will find yourself doing the same types of processes over and over:
- Creating virtual machines to run your code against
- Copy the automation code to the instance
- Running the automation code against your instance
- Performing tests against your instance
These “overhead” process can take a considerable amount of time that you could be spending writing code.
How do we fix this?
Improving our automation development workflow#
Using test-kitchen will help to reduce the amount of time you spend on the overhead and allow you to concentrate directly on writing your automation.
It handles the following processes for you:
- Creating a virtual machine(s)
- Bootstrapping the virtual machine with the automation provider (eg. the Chef or Puppet client)
- Copying the automation code to the machine
- Running the automation code (provisioning)
- Running a verifier to validate the provisioning worked
- Destroying the virtual machine(s)
Test-kitchen with Ansible and Windows#

Ansible provides some additional challenges when trying to use test-kitchen. The way Ansible applies automation against nodes is by using SSH for Linux and WinRM for Windows.
As Ansible was designed to be run on Linux, it is very easy for a Linux node to have Ansible installed locally and do a local apply of the Ansible configuration to itself. Unfortunately, as Ansible does not run on Windows, you are not able to do a self-apply.
This means we need a way to stand up a Linux machine, install Ansible and then make a WinRM connection from the Linux machine over to a Windows node to apply the configuration.
Thankfully, someone has done the hard work for us and created kitchen-ansible, a plugin for test-kitchen which handles this process.
How to install test-kitchen and other requirements#
To use the test-kitchen workflow with Ansible and Windows nodes, we will need to install a few requirements.
The workflow works from both Mac and Windows development machines
- VirtualBox - we will use this as our virtualization provider
- Vagrant - Vagrant provides an abstraction layer for VirtualBox (among other things) that test-kitchen will leverage
- ChefDK - even if you are not using Chef, ChefkDK (development kit) installs everything you need to run test-kitchen from a single installer. This is especially useful on Windows where working with different ruby versions can be slightly painful.
Once the requirements are installed, we will need to install some additional Ruby gems which. The ChefDK comes with its own ruby environment, so we will install the gems there.
chef gem install 'kitchen-ansible'chef gem install 'kitchen-vagrant'chef gem install 'winrm'chef gem install 'winrm-fs'chef gem install 'kitchen-pester'chef gem install 'vagrant-winrm'vagrant plugin install vagrant-winrmWith that, we are ready to look at the test-kitchen workflow.
How to configure test-kitchen#
The way test-kitchen works is by looking at a .kitchen.yml in the directory the command is run from.
You can use the kitchen init command to generate a .kitchen.yml for the current directory, where all your configuration options for your kitchen run will go.
If you want more of the basics about how test-kitchen works, you can have a look at the kitchen.ci site.
For the rest of the post, I will be focusing more on using test-kitchen with Ansible as opposed to basic test-kitchen usage.
Structuring test-kitchen in an Ansible repository#
When working with Ansible, a best practice is to use roles. They give you a little hint about this in the Ansible documentation:
You absolutely should be using roles. Roles are great. Use roles. Roles! Did we say that enough? Roles are great.
To generate the scaffolding for a new Ansible role, you can use the ansible-galaxy init acme --force command, which will give you the following folder structure:
acme/ .travis.yml README.md defaults/ files/ handlers/ meta/ tasks/ templates/ tests/ vars/Inside the acme/ folder, create a directory called kitchen. This is where we will put all the required things for test-kitchen to work.
Here is a look at what the directory structure means.
acme/ .travis.yml ... kitchen/ group_vars/ # used against your test vm windows-servers.yml # vars for the inventory inventory/ # lists your test vm(s) hosts # inventory for ansible to use for tests tests/ integration/ # where integration tests live default/ # the name of the kitchen 'suite' pester/ # pester tests go here default.tests.ps1 # pester test for the default suite .kitchen.yml # kitchen config default.yml # the playbook to run ... vars/This means to use the .kitchen.yml for the Ansible role, you need to do it from the kitchen\ directory.
Example Ansible role repository with test-kitchen#
I have created an Ansible role which installs IIS and updates the index.htm page. It also contains Pester tests.
You can find the entire repository here: https://github.com/MattHodge/ansible-testkitchen-windows.
The kitchen configuration is generic so it can be used with ANY Ansible role repository. All that you would need to do is update the Pester tests in kitchen/tests/integrations/default/pester/default.tests.ps1.
The different stages of test-kitchen#
Once you have the .kitchen.yml file ready, you can now start the test-kitchen workflow.
There 4 major commands you will be using with test-kitchen as part of your workflow.
kitchen list#
Running kitchen list reads the .kitchen.yml and shows you the current state of the environment.
# inside your ansible role directorycd kitchen
kitchen list
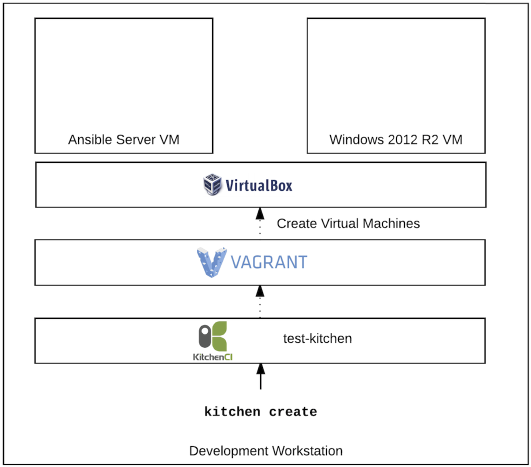
kitchen create#
Running kitchen create will use the kitchen-vagrant driver and provision the virtual machines, a Linux machine to run Ansible from and a Windows machine to apply the playbook against. It also runs the ConfigureRemotingForAnsible.ps1 script to configure WinRM so it is ready for an Ansible connection.
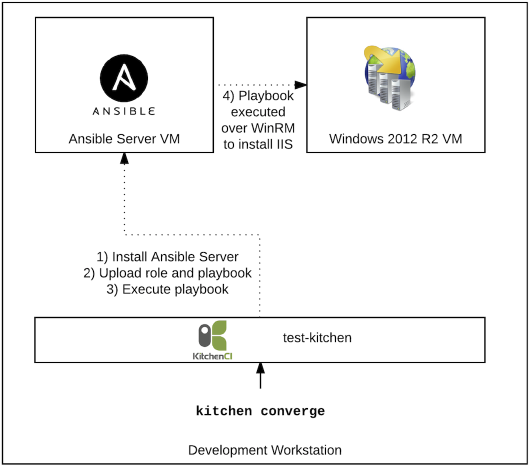
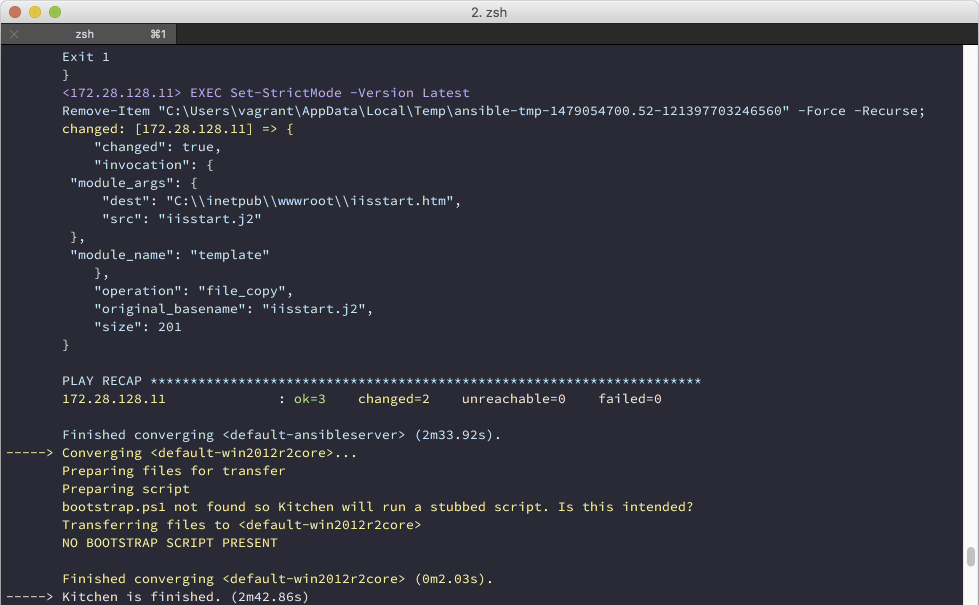
kitchen converge#
Running kitchen converge does multiple things:
- Installs Ansible on the Linux VM
- Uploads the role and the
default.ymlplaybook to the Ansible VM over SSH - Executes the playbook against the Windows VM detailed in the
inventory/hostsfile. The connection information for the Windows VM is stored ingroup_vars/windows-servers.yml. - The Windows VM has the changes applied from the Ansible playbook
As you are developing your Ansible role, you can run this command, again and again, to re-upload the role and re-run it without having to create the VM’s again.
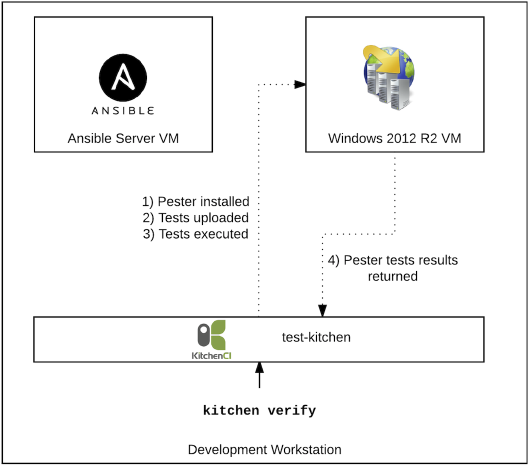
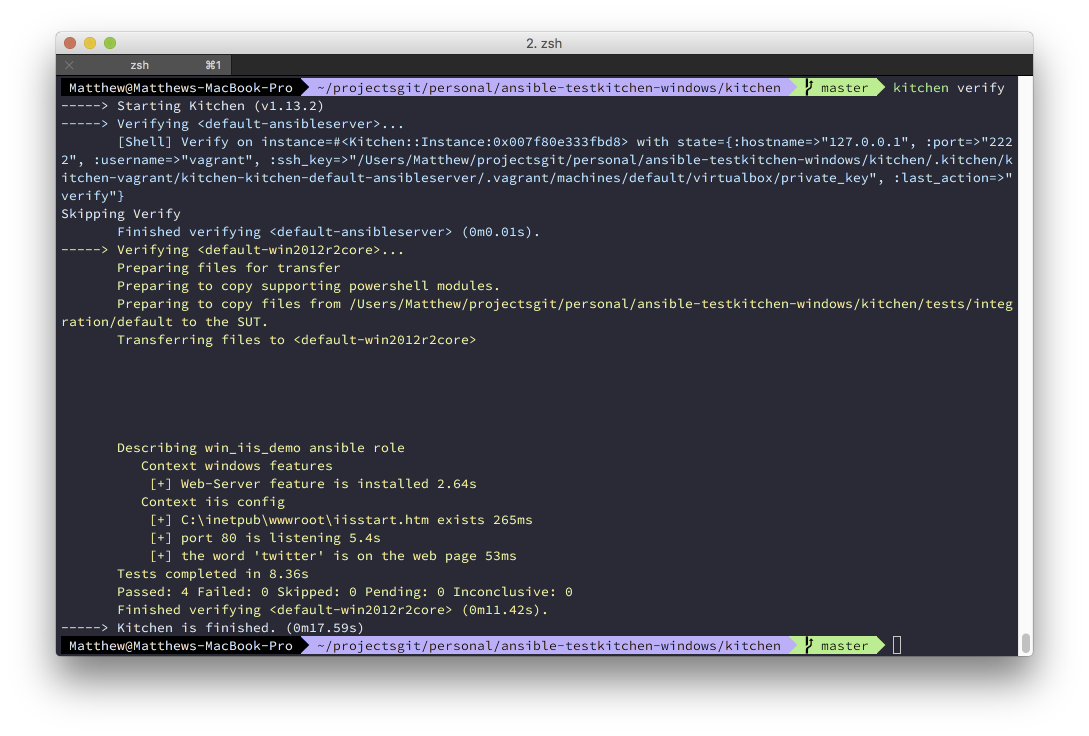
kitchen verify#
Running kitchen verify installs Pester on the Windows VM and then uploads the default.tests.ps1. It then executes the Pester tests and returns the results to the console.
kitchen destroy#
Running kitchen destroy will delete the virtual machines. Simple!
Conclusion#
Using test-kitchen is a great way to speed up your infrastructure automation development process. It also enables you to use the Test-driven development (TDD) process very easily. Developing in this manner gives you a huge confidence boost when making changes to your code.
Be sure to take a look at the https://github.com/MattHodge/ansible-testkitchen-windows repository for the entire file structure, and use it as the base for all your Ansible role to make them testable!